Difficult
133 files
-
Herbstmanoever an der Marienburg (Autumn Exercise near Marienburg Castle)
This scenario is a bit different. This is not real war but an exercise.
Autumn maneuvers, eighties, south of Hanover. The player controls BW units, the aim of which is to pass over the River Leine below Marienburg Castle. This is followed by an advance along federal highways 3 and 1 towards Elze, Hemmendorf, Coppenbrügge. The Leinebrücke below the Marienburg, south of Hanover in Lower Saxony, was often the scene of heavy "fights" during the big exercises in the 80s.
https://youtu.be/hVZYffcoHiE
There is civil traffic and units that are not involved in the actual fighting.
Larger scenario with a time approach of several hours.
There is no score system since I don`t have a clue yet as is works.
I grew up in this area and have a lot of memories about these exercises.
I am thankful for any comments or hints.
There is also a YouTube channel: https://www.youtube.com/channel/UCPLfbbc7RNuhJMmnrNGOOGg
82 downloads
(0 reviews)0 comments
Updated
-

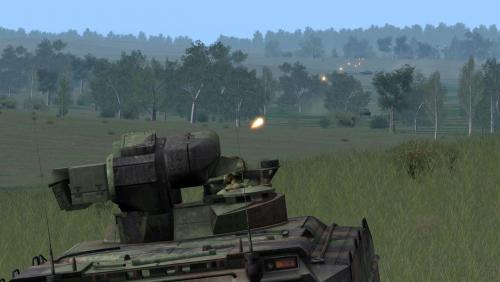
Armata's on the prowl
By Assassin 7
Armata's on the prowl
by Assassin
Note: Map Contacts are on and units are repositioned from the Abrams version. Units have been changed also. Long range spikes added.
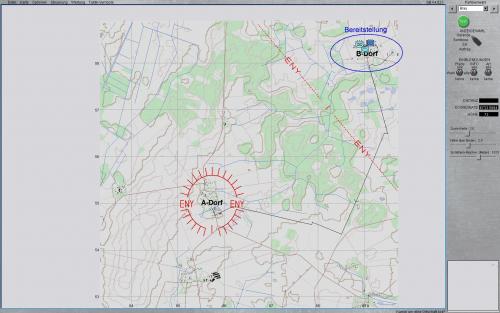
1. SITUATION
a. Enemy. 4th Guards Kantemirovskaya Tank Company with 2nd Guards Motor Rifle Infantry support commanded by Commander Lacika have secured Twin Bridges and are defending
it. They also have set up an FOB North of the Bridges. These units consists of T-14's Armata's, T-15's Armata's with Infantry including AT-14's.
They also have limited ICM support but have medium HE and Smoke support.There is a minefield threat which has been marked on the map. stay out of it
They are ready to fight and are saying to LETS DO THIS!!
b.Friendly: OK here's the deal, you will first have to select the broken M60 at the beginning of the mission. This M60 will be destroyed at 10 minutes
of mission time for mission conditions. You will have to select ONLY 1 Trigger to get your forces. This is entirely up to you. If you select
more than one trigger you mission will be failed. You do have the option to Surrender if needed. Ok your options are:
Triggers:
1.Spawn Leopard 2E's Company:
CO-Leopard 2E
XO-Leopard 2E
1/B-4x Leopard 2E's
2/B-4x Leopard 2E's
3/B-4x Leopard 2E's
4/B-4x Pizarro's with spike-MR/LR support/ long range
5/B-4x Pizarro's with spike-MR/LR support/ long range
2.Spawn Leopard 2A6 Company:
CO-Leopard 2A6
XO-Leopard 2A6
1/C-4x Leopard 2A6's
2/C-4x Leopard 2A6's
3/C-4x Leopard 2A6's
4/C-4x CV90 / 40-B with Spike-MR/LR support /long range
5/C-4x CV90 / 40-B with Spike-MR/LR support /long range
3.Spawn UK Company Armor:
CO-Challenger 2
XO-Challenger 2
1/D-4x Challenger 2's
2/D-4x Challenger 2's
3/D-4x Challenger 2's
4/D-4x Warrior(ODS) with Milan support
5/D-4x Warrior(ODS) with Milan support
4.Spawn DK Company:
CO-Leopard 2A5-DK
XO-Leopard 2A5-DK
1/E-4x Leopard 2A5-DK's
2/E-4x Leopard 2A5-DK's
3/E-4x Leopard 2A5-DK's
4/E-CV90 /35-DK with Milan support
5/E-CV90 /35-DK with Milan support
5.Spawn US Company
CO-M1A2 SEP
XO-M1A2 SEP
1/F-4x M1A2 SEP's
2/F-4x M1A2 SEP's
3/F-4x M1A2 SEP's
4/F-4x M2A2 Bradley's with Javelin's
5/F-4x M2A2 Bradley's with Javelin's
2. MISSION
Select one Trigger for your units, Then attack northwest to take control of Twin Bridges and Enemy FOB. Destroy any enemy that is encountered.
3. EXECUTION
a. Purpose. The purpose of this operation to clear enemy forces from our AO in order to continue offensive operations to the Northwest.
b. Key Tasks
1. Take Control of Twin Bridges
2. Take Control of Enemy FOB
3. Destroy all enemy encountered
c. End State.
1. Enemy is defeated/destroyed; unable to continue offensive operations
2. Taken control of Twin Bridges
3. Taken control of Enemy FOB
4. Minimal collateral damage or disruption to civilian way of life
d. Fires
Off-Map support:
Rounds per tube- HE-36
Smoke-36
ICM-12
Air Strike
Missions-15
Aircraft available-5
Tubes:
Tubes per battery-6
batteries-3
Total tubes-18
HE:648
Smoke:648
ICM:216
4. Service & Support
a. Recovery. 2/1/A Wisent ARV with RWS
b. Repair. None
c. Medical. 4/1/A VAMTAC Ambulance
d. Supply. 1/1/A M977 HEMTT with OHWS:M2HB (2x trucks)
188 downloads
(0 reviews)0 comments
Updated
-

Abrams on the prowl
By Assassin 7
Abrams on the prowl
by Assassin
Note: Map Contacts are on
1. SITUATION
a. Enemy. 2/69 US Alpha Company with 1/15th Heavy Mechanized Infantry support commanded by SB Commander Assassin have secured Twin Bridges and are defending
it. They also have set up an FOB North of the Bridges. These units consists of the mighty M1A2 SEP's, M2A2's with Infantry including ATGM's.
They also have limited ICM support but have medium HE and Smoke support.There is a minefield threat which has been marked on the map. stay out of it
They are ready to fight and are saying to LETS DO THIS!!
b.Friendly: OK here's the deal, you will first have to select the broken T-90 at the beginning of the mission. This T-90 will be destroyed at 10 minutes
of mission time for mission conditions. You will have to select ONLY 1 Trigger to get your forces. This is entirely up to you. If you select
more than one trigger you mission will be failed. You do have the option to Surrender if needed. Ok your options are:
Triggers:
1.Spawn Leopard 2E's Company:
CO-Leopard 2E
XO-Leopard 2E
1/B-4x Leopard 2E's
2/B-4x Leopard 2E's
3/B-4x Leopard 2E's
4/B-4x Pizarro's with spike-MR/LR support/ short range
5/B-4x Pizarro's with spike-MR/LR support/ short range
2.Spawn Leopard 2A6 Company:
CO-Leopard 2A6
XO-Leopard 2A6
1/C-4x Leopard 2A6's
2/C-4x Leopard 2A6's
3/C-4x Leopard 2A6's
4/C-4x CV90 / 40-B with Spike-MR/LR support /short range
5/C-4x CV90 / 40-B with Spike-MR/LR support /short range
3.Spawn UK Company Armor:
CO-Challenger 2
XO-Challenger 2
1/D-4x Challenger 2's
2/D-4x Challenger 2's
3/D-4x Challenger 2's
4/D-4x Warrior(ODS) with Milan support
5/D-4x Warrior(ODS) with Milan support
4.Spawn DK Company:
CO-Leopard 2A5-DK
XO-Leopard 2A5-DK
1/E-4x Leopard 2A5-DK's
2/E-4x Leopard 2A5-DK's
3/E-4x Leopard 2A5-DK's
4/E-CV90 /35-DK with Milan support
5/E-CV90 /35-DK with Milan support
5.Spawn 2 Companies of Russian AR
CO-T-72B1 m.1982
XO-T-72B1 m.1982
1/F-3x T-72B1 m.1982
2/F-3x T-72B1 m.1982
3/F-3x T-72B1 m.1982
4/F-3x T-72B1 m.1982
5/F-3x T-72B1 m.1982
6/F-3x T-72B1 m.1982
7/F-3x BMP-2's with AT-14 support
8/F-3x BMP-2's with AT-14 support
9/F-3x BMP-2's with AT-14 support
2. MISSION
Select one Trigger for your units, Then attack northwest to take control of Twin Bridges and Enemy FOB. Destroy any enemy that is encountered.
3. EXECUTION
a. Purpose. The purpose of this operation to clear enemy forces from our AO in order to continue offensive operations to the Northwest.
b. Key Tasks
1. Take Control of Twin Bridges
2. Take Control of Enemy FOB
3. Destroy all enemy encountered
c. End State.
1. Enemy is defeated/destroyed; unable to continue offensive operations
2. Taken control of Twin Bridges
3. Taken control of Enemy FOB
4. Minimal collateral damage or disruption to civilian way of life
d. Fires
Off-Map support:
Rounds per tube- HE-36
Smoke-36
ICM-12
Air Strike
Missions-15
Aircraft available-5
Tubes:
Tubes per battery-6
batteries-3
Total tubes-18
HE:648
Smoke:648
ICM:216
4. Service & Support
a. Recovery. 2/1/A Wisent ARV with RWS
b. Repair. None
c. Medical. 4/1/A VAMTAC Ambulance
d. Supply. 1/1/A M977 HEMTT with OHWS:M2HB (2x trucks)
188 downloads
(2 reviews)0 comments
Updated
-

Operation Domino
By cobrabase
Feburary 13th 1989
The first domino has fallen...
Simple mission: Lead elements of a Soviet mechanized infantry regiment are probing through the outer defense lines of Fulda. Whack them.
National Guard M-60A3s were on exercise to the south-west when hostilities broke out and the week-end warriors are scared shitless. Use your new M1A1s utilizing the terrain to stop the enemy advance.
You have a platoon of mortars ready to provide indirect fire.
Enemy consists of T-64B along with mechanized infantry.
No triggered ending. Lasts approximately 25 minutes.
226 downloads
(0 reviews)0 comments
Updated
-
Kampf um eine Ortschaft
By v.Trittwitz
Your task is to assault an enemy strongpoint and hold it against Sowjet counter attack. The strongpoint is defended by a mixed force of inf and mot.inf. that is supplemented by arty observers and regimental arty. Enemy arty and anti-tank means provide the backbone of the defence.
Careful reconnaissance will identify strong and weak spots of the enemy’s defence.
The attacker has to deal with a wide and open terrain that surrounds the strongpoint, facilitating dominating fields of fire for the Sowjet defender. The attacker should select weak enemy spots for attack and utilize smoke screens during the initial assault. Identification and exploitation of the enemy’s weak spots is as fundamental for the initial assault as is utilizing the terrain during assault and later defence. Failure to identify the weak spots and not anticipating the destructive force of arty may result in total destruction of the assault force.
Economy of force is also fundamental for winning this mission. Use maximum force during initial assault. Immediately after the initial assault, designate strog forces as reserves. Use only minimum forces for mopping up after initial assault. And remember, a strongpoint is best defended from flanking positions from outside the strongpoint. Anticipate a Sowjet counter attack any time.
This is basically a text book mission. Despite this and although defender and attacker employ only small forces, the fighting will be though. Do not expect to successfully assault and defend the village with the first attempt.
Please provide feedback on the scenario for future improvements of this scenario and potential other scenarios.
225 downloads
-

1991 Aachen Assault - SB Cav Tribute Scenario
By Tankriver658
This scenario is dedicated to my good friend Steel Beasts Cavalry aka. Cobra (base).
This is a scenario that would follow on to one of my previous and best scenarios, "Gradual Retreat". This one took a while as I wanted to perfect this scenario, It is accurate, ammo types are accurate to the year as well as vehicles, (But just think that the army national guard are still operating the M901's).
---
After the gradual retreat scenario, the Soviet forces over run the defensive line and are moving with a large force, but the time bought has been used for our rear forces to establish a 170 Km defensive line, this is last line of defence before the Soviet forces reach France.
The rest of the British forces left in the UK are mobilsed and will be in France within the next 16 hours, along with a 4 hr transit time before the first brigade of Challenger 1's can arrive from 4 Royal Tank Regiment. They have been redeployed from the Gulf.
US Forces in the area have organised a defensive strategy to reppel the soviet advance, however it is unclear as to whether it will work. 2 ACR is divided into sub groups within sectors, groups 1-8 are defending Alpha section (North), whilst 9-18 are defending Bravo section (South). Each group holds a 10km wide gap, Alpha section stretches 80 Km, leaving bravo section with 90 Km. This 170 Km line is to protect France and Belguim, however France is under threat the most.
3 Group, 2 ACR's forward elements are expected to make contact with scouting elements from the first echelon of a detachment from a Guards divison, the 5th Motorised Infantry Regiment.
"2-6/A. Contact BRDM 2 platoon, moving East Grid square 20, 53."...
246 downloads
(0 reviews)0 comments
Submitted
-

Red Storm Rising Defence of Alfeld
By Tankriver658
USSR forces have penetrated deep into the heartland of Germany, losses are high on both sides, its a race to see who runs out of weapons, men and ammo last. The NATO side have an armoured brigade inbound from the US in the next four days but it will mean a loss of the war if they do not reach Germany soon. The Bundeswehr are at a point where they won't surrender ground, and will fight to the death to defend their country.
We must stop a Soviet advance at Alfeld, this should halt the central sector if the bridges across the river Leine are destroyed, these are the only ones in the area that can support heavy loads.
It is our job to destroy the enemy's main echelon as much as possible, whilst doing a tactical retreat to the left side of the Leine, and FASCAM the bridges... This is what is supposed to happen. (Didn't in the Book)
---------
In the book, this was an unorganised defence from the UK's "3 RTR (3rd Royal Tank Regiment)", US Armoured Cav units, and the German Bundeswehr.
Challenger 1's were engaging in the streets of Alfeld, the Bundeswehr were wiped out, the US actually had the sense to pull out, and put bradley's on the ridge behind the river, but a T-72/ T-80 Coy crossed the bridges before they were destroyed and killed the US forces.
Don't let this happen...
387 downloads
(0 reviews)0 comments
Submitted
-

The time now is 1400 Hours 10-06-1973 Somewhere on the Purple Line
By dpabrams
10061973 1400 HRS *******PENDING SYRIAN ATTACK*********
The Syrians have attacked in strength across the length of the Purple Line in battalion strength (T-55A's) with additional support from mechanized infantry in BTR's.
You defend the Purple Line from Mutzav 117 with a platoon of Shot Kal with some reserves.
190 downloads
(1 review)0 comments
Submitted
-

The time now is 0600 Hours 9-15-1982 Somewhere in South Korea v1.0
By dpabrams
09151982 0600 HRS *******PENDING NORTH KOREAN ATTACK*********
You will command a Calvary Platoon (M60A3) in a prepared defensive position south of the DMZ, in preparation of a battalion (+) assault from a North Korean tank battalion.
225 downloads
(1 review)0 comments
Updated
-

Operation White Scorpion Mission 4
By Tankriver658
30 Mins ago UKLF and US 11th ACR made contact with the forward echelon of the main force of the 4th Guards Regiment of the DPRK.
The Kings Royal Hussars of the UKLF and 11th ACR had been assisted by USMC, M1A1 HA's and M113 APC's, along side Cobra Helos and Chinooks. 2 PARA have airdropped in the AO 2 hours ago and are mounted on GTK Boxers.
We are about to make contact with the full force of the Guards Regiment, We must make sure that they do not cross DL Delta or they will destroy the nuclear reactor just south of DL Delta, heat will cause a fission reaction and dump radioactive air into the atmosphere, POISONING SEOUL AND SOUTH KOREA!
It is our job to hold back the enemy until they have stopped attacking, it will be difficult... DO NOT LET THEM CROSS DL DELTA.
------
Notes: I hope this scenario scares you... at times you WILL think wha the hell am I supposed to do.
But then think about if this was real life, with everthing going on around you in that battlefield.
Enjoy!
Last one of the series, its been a blast!
184 downloads
(0 reviews)0 comments
Submitted
-

Invasion of England
By Tankriver658
The title speaks for itself...
Your Stationed at Sailsbury plane... then the worst happens!
This scenario should scare you and HM Government.
137 downloads
(0 reviews)0 comments
Submitted
-

Defence in Sector
By Mav
Hi
Here is a pretty complex (red) scenario, that challenges your decision making in the field and your ability to read a map for defensive positions.
You have control of a reinforced Danish Leopard 1-A5 DK-1 tank platoon. It has been reinforced with 2 more Leopards from B-company and 6 M-113's with 106mm mortar. Appart from that you have a couple of scout GD's and a support attachment.
The OPFOR consists of 6 different levels ranging from 1 tank platoon to a brigade size force with support units. Furthermore the OPFOR can be enhanced with M-24 Hind airsupport, Mi-8 Airborne troops and/or a section of MRLS. So all in all a lot of different possibilitys of OPFOR.
Blue force is conducting a Defence in Sector, and OPFOR is conducting a Meeting Engagement.
Take your time in the planing phase so you don't get stuck with an element in the marsh or misplaced vehicle emplacements. Make sure you know how to get from one side of your sector to the other and have you your artillery priorities planed.
176 downloads
- single
- multiplayer
- (and 4 more)
(2 reviews)0 comments
Updated
-

Operation White Scorpion Mission 3
By Tankriver658
This is the third mission to the series.
We see the the contact with the first bulf of the main armoured force.
We have a defensive line set up near defense line Charlie, with TOW units, ITV's and FISTV's. The worst part is that there is an imminant attack...
The good news however, its stopped raining.
USMC will arrive however ETA unknown.
1 PARA will airdrop 2 GTK Boxer Troops as a response shock force.
Cobras are inbound, 3 mins ETA.
Notes:
The Routes are randomised...
Again no voices, sorry.
Any problems send me a msg.
191 downloads
(0 reviews)0 comments
Submitted
-

Operation White Scorpion Mission 2
By Tankriver658
This is the second mission in the Operation white scorpion series.
This is large contact with advance guard.
DPRK forces will attack in a soviet 1980's style way.
Do not let the enemy pass DL Delta or you loose the game.
The Bulk of enemy forces will come in Missions 3 and 4. But hold the line for now.
Good Luck.
220 downloads
(0 reviews)0 comments
Submitted
-

Operation White Scorpion Mission 1
By Tankriver658
2nd day in the war in North Korea...
4 Part scenario. This is the introduction to the campaign. You will get to see the battlegroup that you will deploy with in Mission 2.
So look at the map, work out LOS, firing positions and other areas of interest!
Your forces are a half US group, Brigade comnbat team detachment, then UK forces of the Kings Royal Hussars as a detachment.
---------
Notes: There are no enemy forces in this mission!
Mission 2 ***Has**** been completed, however scripts need to be done for voice acting.
The List of Voice actors that are in the scenario will be the voices for Mission 2.
A BIG shoutout to Cobrabase and Matsimus for inspiration on this mission.
Mission Audio files will need to be inserted into the relavent media folder.
239 downloads
(0 reviews)0 comments
Submitted
-
NIGHT training Stv122 and CV90-40B
By KKnispel
NIGHT training scenario. Based on Camp Hornfelt training scenario, only change is time and unit types
98 downloads
(0 reviews)0 comments
Submitted
-

Organic support defence
By Tankriver658
11 ACR organic support will be under attack by a USSR motorised force that have the intent in taking over an airfield.
We have to defend just using M88A1s, M113 ENG and M113 Repair and a few other vehicles to stop the enemy advance.
We have to stop the enemy from overruning the airstrip, and wait for BCT 2 (Brigade Combat Team) to arrive with reinforcements.
Good luck
128 downloads
(1 review)0 comments
Submitted
-

HVI Rescue UK
By Tankriver658
We have a some hostages in an two separate AOs and need to be recovered and driven back to an LZ.
However it means having to push through a fet t-90s and BMP-3's.
We will have to do a double pincer movement that will outflank the enemy.
We have three hours to extract the hostages and then move them back to the LZ.
105 downloads
(0 reviews)0 comments
Updated
-

HVI Rescue-DE
By Tankriver658
We have a some hostages in an two separate AOs and need to be recovered and driven back to an LZ.
However it means having to push through a fet t-90s and BMP-3's.
We will have to do a double pincer movement that will outflank the enemy.
We have three hours to extract the hostages and then move them back to the LZ.
160 downloads
(0 reviews)0 comments
Updated
-

HVI Rescue US
By Tankriver658
We have a some hostages in an two separate AOs and need to be recovered and driven back to an LZ.
However it means having to push through a fet t-90s and BMP-3's.
We will have to do a double pincer movement that will outflank the enemy.
We have three hours to extract the hostages and then move them back to the LZ.
169 downloads
(0 reviews)0 comments
Updated
-

Scouting (gone wrong)
By Tankriver658
We have 6 M3A2's (without the infantry inside) conducting a reconissance and a counter reconissance mission to eleminate any enemy reconissance/forces.
Enemy forces should only really consist of BMP3's, BDRM2's etc.
To win kill most of the enemy scouts/forces and dont let them enter the red zone.
FASCAM strips to help stop the enemy probing advance.
143 downloads
(0 reviews)0 comments
Submitted
-

US 1989 Reinforced Mechanised Attack
By Tankriver658
Hostile forces are dug in around an area, the SRR (Special Reconnicance Regiment) have located specific objectives and identified enemy equipment, t-80's, t-72'setc.
1st Battalion, 5th ACR are to conduct an assault to capture all five objectives and destroy any enemy armour.
195 downloads
-

Team Yankee Mission 1
By CharlieB
This mission is based on the first mission from Team Yankee. It has been some time in development. Grateful for comments good and bad.
Not sure I have mastered the scoring yet...
408 downloads
(2 reviews)0 comments
Updated
-
Yet more Tanks
By Rotareneg
Yet another variant of the old "Tanks!" scenario. Randomized starting location for your vehicle and enemies, enemy riflemen in woods, FASCAM artillery, and ATGM teams.
Includes separate scenarios for:
BMP-2 Centauro CV90/30-FI CV90/35-NL CV90/40-C Leopard 2A4 Leopardo 2E Leopard AS1 M1A1(HA) M1A2(SEP) M3A2(ODS) M60A3(TTS) Marder 1A3 T-72B1 (m.1985)
Too hard, too easy, or want different tank or different enemies? Load it up in the mission editor and change 'em, it's easy!
417 downloads
(1 review)0 comments
Submitted
-

Tanks ProPE M-966 TOW Humvee
By Mogwa
Your M-966 vs 9 T-series tanks in a fight to the death on a small map. Resupply is available. Based on the original Tanks scenario by an unknown creator.
73 downloads
(0 reviews)0 comments
Updated