norrin
-
Posts
14 -
Joined
-
Last visited
norrin's Achievements
")


-
Here's a series of shots from a session yesterday featuring my tank de jour, the Leopard AS1, this time wearing an urban mudcam. Luckily enough I managed to get two shots into the T-72A before he even realised I was there.

-

Version 1.0.0
69 downloads
Leopard AS1 Gelbolive v1.0 - 10th August 2019 Firstly, I must send my sincere thanks to eSims games for their excellent sim and to dejawolf for his vehicle templates - without them my job would have been much harder. Description: When the Leopard AS 1 Main Battle Tank first entered service in Australia in 1977, the fleet arrived in the German Army’s semi-gloss dark green anti-infrared paint – Gelbolive (RAL6014). For the first few years of service the gelbolive finish remained standard; however, as vehicles underwent extensive repairs they were often repainted in semi-gloss olive drab, prior to the introduction of the AUSCAM 3-colour finish in the early 1990s (as depicted in eSim's default AS1 texture). Despite these changes, examples of Leopard AS1 MBTs with the gelbolive finish remained in service well into the 1990s. Contents: Four variants of the gelbolive Leopard AS1 HD textures (2048 x 2048 px) are contained in this package. A. Clean with default decals/markings B. Clean with new decals/markings C. Dirty with default decals/markings D. Dirty with new decals/markings A new normal map specifically made to work with the new textures. Please see enclosed readMe for details on installation. -
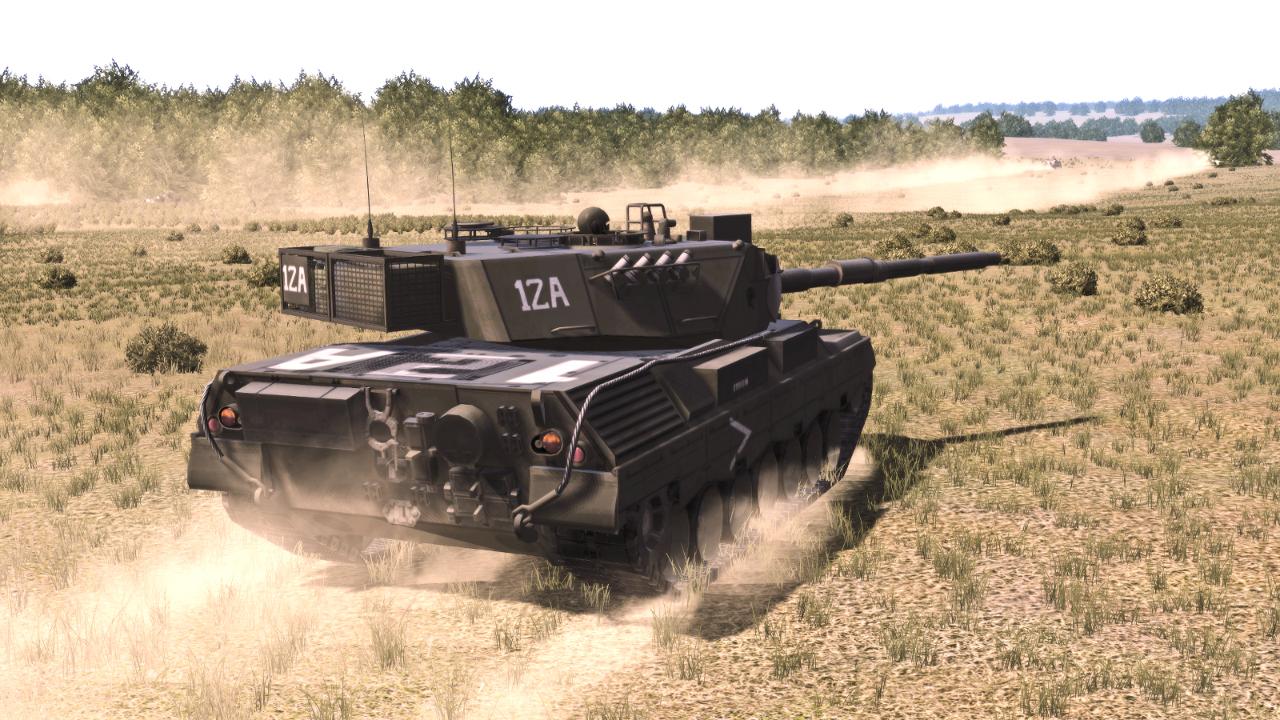
@stormrider_sp - Sorry, but I didn't keep a track of the shaders used for each variation - I was mainly trying to show how easy it was to make subtle chages to the the light and colours. Here's a couple of pics of the new WIP Gelbolive skin for the Leo AS1 - the first with the default decals and the second with decals more in keeping with the new skin. I'll hopefully get it posted sometime over the weekend.
-
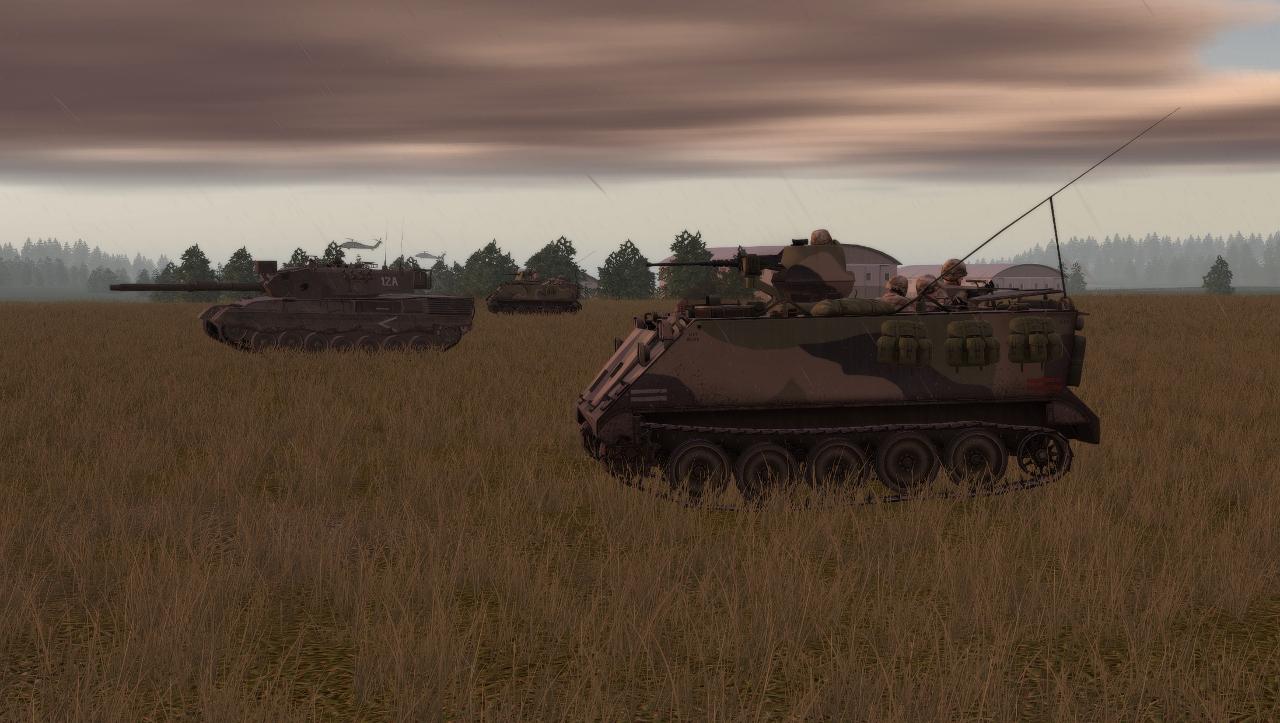
@DK-DDAM - Sorry to harp on about this but to clarify and to do crosire's very clever software justice, ReShade allows you to manipulate light intensity, colour (RGB) saturation, bloom, HDR, image sharpness/blurriness, depth of field etc in almost an infinite number of ways. Here's roughly the same image with different combinations of just a few of the various default shaders enabled and disabled so you get a better idea of what's possible - the sky is often the best way to identify the differences in the various images.
-
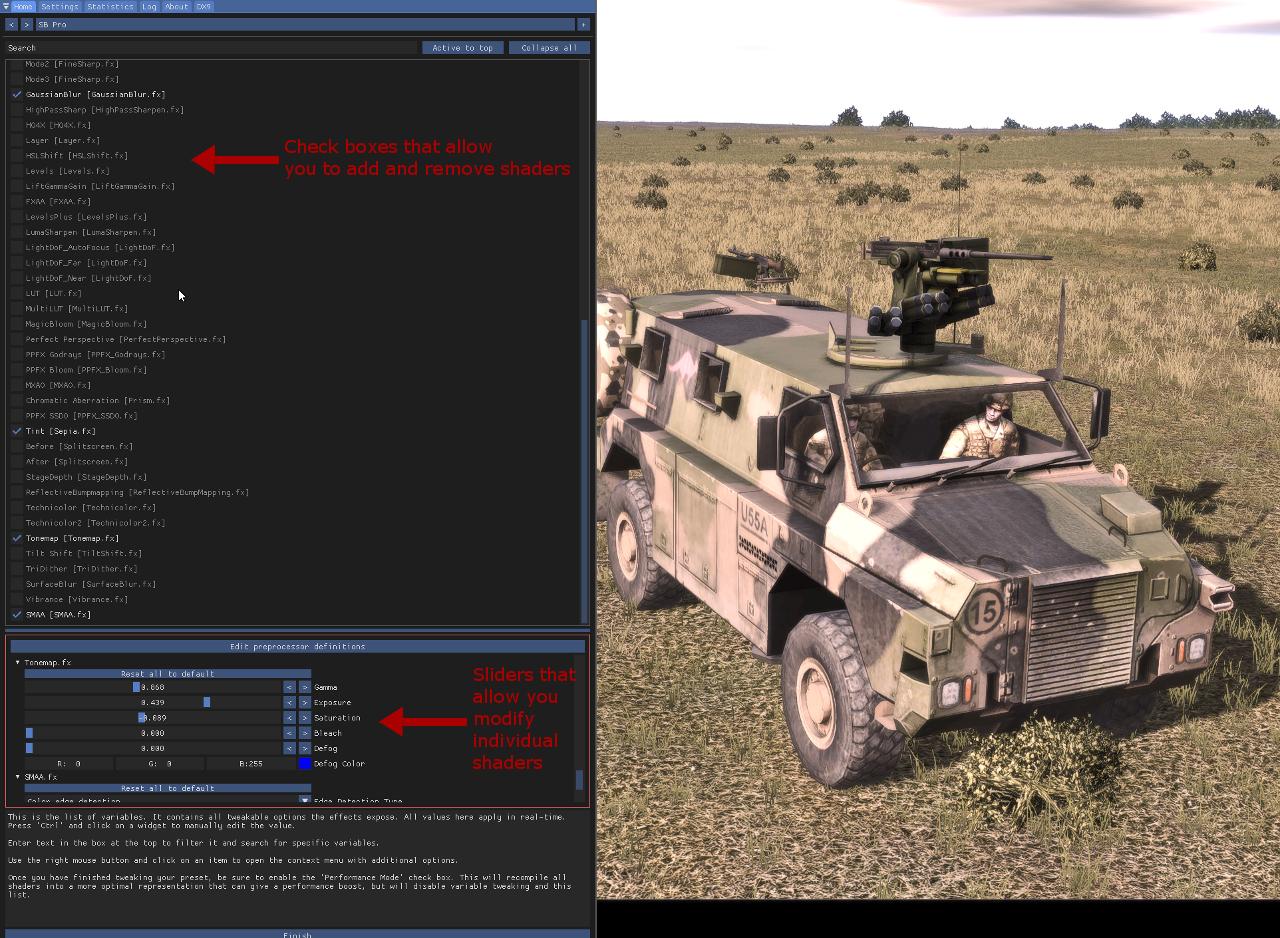
@Vikingo - I'm happy to share them but I want to fix a few errors and tidy them up a bit first, so it might take a little while. @Koen - you can download ReShade from here: https://reshade.me/ This program allows you to inject a wide array of new shaders into almost any game, including the well known SweetFX suite. 1. Once you download the .exe, run it, and a pop-up window appears and it will ask you to select the executable of the game you want to add ReShade to - so you need to find the SBProPE64cm.exe, which you can find in the Release sub-folder of your main Steel Beasts install - select this exe. 2. You then need to select Direct3D 9 as this the version of directX that SB Pro PE runs on. Once you have selected Direct3D 9 in the Reshade pop-up the program will ask if you want to download a default set of shaders. Click yes. The program then downloads the shaders automatically and you can choose, which ones you want to keep. 3. There's quite a few shaders that are pretty much useless but I recommened that the first time you try ReShade you download them all so you can test them all to see, which ones will be useful in future. 4. Run steel beasts - if you've set up ReShade correctly you should see this text pop-up as the game loads. Depending on your processor's speed the game load may hang for a few seconds as the shaders compile, I find on my PC it adds approx 1 second to game start-up. 5. Start a mission and once in sim press the "Home" key on your keyboard (the default ReShade menu key) and the program will walk you through the process of adding a ReShade profile to the game. Once you've done this every time you hit the "Home" a list of drop down shaders appears that will look something like this. Just check the boxes of the shaders you want to add or remove and if you're feeling adventurous play around with the sliders at the bottom of the menu. 6. It should be noted that adding shaders may reduce your fps. Most seem to decrease fps by only 1 or 2 frames per second but some may decrease fps by as much as 10 fps so if you're struggling with frames you need to monitor how each shader is affecting the sims perfomance. 7. You'll find on the settings tab of the ReShade in game menu useful additional settings such as an ingame fps counter and clock or you can set up keys to enable/disable all shaders etc, which can useful when navigating the Steel Beasts menu or map editor etc. 8. Whether you use ReShade or not is very much up to each individual and no doubt many of you will prefer the default look of the sim (see picture below). In sim comparison showing shaders disabled and enabled. 9. I find I use different shaders for different times of day or weather conditions. But don't forget there are also a number of other useful settings that are available in Reshade, for instance you can enable FXAA and/or SMAA anti-aliasing for an extra boost to your anti-aliasing at the expense of only a couple of fps. In addition you can inject split screen modes (eg. Depth3D), which can then be used in combination with vorpX or Steam VR to play the sim in VR using an Occulus Rift or Vive etc. Good luck!
-
@Yskonyn - its called: generated-Light_woods_03_200vu @Hoover - I have to admit I'm also running some home-made HD textures as well as ReShade to inject additional shaders and effects into the sim but the overall effect is excellent.
-
Just a couple of shots from the 4.157 release. The first showing off the dust and the second something I haven't seen before but no doubt has been in the sim for some time - nothing quite like some unexpected secondary explosions followed by the turret launching gracefully into the air.
-
 norrin changed their profile photo
 -
You're right, I think I may have bitten off more than I can chew regarding Firebase Coral but I'd looked at Binh Ba and I wasn't sure how well I could simulate the house-to-house fighting that characterised that battle using Steel Beasts. Then again, I can't think of any sim, or game for that matter, that does AI infantry combat in urban areas particularly well, which isn't surprising really given the variables at play. As you know, despite being involved in several major conflicts since WWII, Australian tanks have only really played an active combat role during the Vietnam War and other than the Vietnam mod released by the ADF, I think, for VBS1 I cannot think of another sim that has really tried to simulate this conflict from the Australian perspective. Given the key models required are available in Steel Beasts, I've recently worked out a method for injecting 3D VR into the sim using my Occulus Rift and a simulation of Vietnam has long been a pipe dream of mine, I'd originally hoped that I get away with reskinning the US 1970 soldiers and M113A1s to look more like their Australian Army counterparts , maybe even creating a small map with a Vietnamese style village but I'm no doubt over reaching - gee I've never done that before Maybe, I'd be better off attempting this in ArmA3 but its going to take a lot longer as I'll have to model, config and animate the centurion and its interior as well as various other bits and pieces and in the past I've found working with parts of that community and the game engine in particular fairly frustrating and disheartening. Anyway, here's where I got to with the Centurion last night, the return rollers look a bit naff, as does the coaxial mount, so there's still a lot of work to do if I decide to continue.
-
I think you may have hit the nail on the head as my wife is forever telling me that I'm superficial. @TSe419e - thank you for the information. @Gibsonm - I've been reading about the Battle for Balmoral and Coral recently in particular the role played by the Centurions in this battle and I wanted to make a scenario roughly based on the forces present. I understand that there are many shortcomings in the approach I'm taking but it is the best that I can do with the resources at hand.
-
Oops, to be honest I hadn't even noticed they were missing. I was actually referring to the teeth that run down the centre of the inside of the tracks - not entirely sure what the technical name is. If you look at the picture you can see that each tooth is outlined by a small transparent region. In regards to the missing return rollers you've given me an idea, I may be able to paint/skin them onto the relevant texture regions I have deleted to remove the skirts. I've got no idea how that will look though as they will not be 3D objects so they will look good from directly side-on but may look at little strange at other angles. I'll also have to remove the front lights and try and to reshape the canvas mantlet cover so it looks more like the following photo.
-
This is my first attempt at making a Centurion MK 5/1 with the side skirts removed as used by the Australian forces in Vietnam. So far I've got the skirts off and removed the associated decals but I was wondering if anyone knew how to fix the transparency/alpha issues related to the vertical guide horns on the tank's tracks?
-
I'll have to check when I get home from work tonight - I'll update this post then. EDIT: It's the AS Desert terrain.
-
Just couldn't stop myself from posting a few shots of a mission I played last night using a custom texture I've made for a Marines M60a3 circa Desert Storm (I have read that apparently the Marines got their hands on eleven a3s from the Army not long before the Battle of Kuwait International Airport). I still need to make a new 'Desert Storm' texture for the M113s, but I can't get over how good the sim now looks and how much I'm enjoying all the new features especially the 'top-down' observer cam.
-
Its always nice to have back up