Piranha DF30

Piranha DF30: Fire Support / Reconnaissance Vehicle
Statistics
Main gun: 30mm
Ammunition Stowage: 50 ready KE, 150 ready HE/120 stored (shared)
Default Ammunition "A": 90 NM225 APFSDS-T, 230 Raufoss MP-T
Coaxial machine gun: 7.62mm M240
Ammunition Stowage: 690 ready/690 stowed
Default Ammunition: 690/690 7.62mm NATO
Grenade Dischargers: 50mm smoke dischargers
Ammunition Stowage: 8 ready/16 stowed
Default Ammunition: 8/16 Multispectral smoke
Armour protection:
Frontal Turret Armour: 39mm vs KE, 147mm vs HEAT
Frontal Hull Armour: 39mm vs KE, 147mm vs HEAT
(SB documentation)
Combat Weight: 19.5 tonnes
Length: 7.57m (Hull)
Width: 2.75m
Height ?m to turret roof
Engine: 400hp Caterpillar C9 diesel
Top Speed: 105kph
General
The Pirnaha DF30 is a variant of the Swiss MOWAG Piranha IIIC 8x8 armored personnel carrier family.
In 2006 the Belgian Army ordered 242 Piranha IIIC variants, 40 of which were fitted with the CMI Defense 90mm turret. These vehicles were known as the Piranha IIIC Direct Fire 90, or DF90. Additionally, some of these were fitted the the Elbit ORCWS 30 RWS turret.
The DF30 can support other Piranaha IIIC armored vehicles with direct fire. The operational concept behind these lightly armored vehicles is to emphasize speed, deployability and maneuverability.
The main role of the DF30 in the Belgian Army is to support the infantry and for reconnaissance. It is effective against light armored and non-armored vehicles, buildings, fortifications and infantry.
Thermal Signature


Crew Positions
Commander's Position F7

In Steel Beasts Professional the tank commander's position on the DF30 is fully crew-able and fully modeled. The commander's position is accessed by pressing F7.
From this position the user can raise and lower their perspective (and exposure level) by holding the Q key (to go up) and the Z key (to go down). The TC can also button or unbutton (close and open the TC's hatch) by pressing the B key (toggle). While unbuttoned, the TC may also wish to use binoculars to get a closer view on a distant area by pressing the N key (toggle).
Commander's Display Unit
The heart of the commander's position is the Commander's Display Unit. This the display is a multifunction display (MFD), similar to the MFD on a typical RWS. The commander can access his display unit, which is the heart of the vehicle, by pressing F2.

The display unit has a row of buttons around the left, bottom and right side of the screen. These buttons correspond to the on-screen labeled boxes around the edge of the screen.
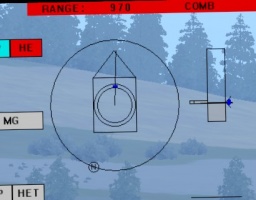
Vehicle compass

Vehicle compass with yellow arc showing the general direction it received a lase from


In the upper left of the screen are a series of icons and symbols. The box with a triangle on top is the vehicle's hull (as if looking down from above). The circle in the middle of the box represent the turret, while the long line that extends from the center of the circle is the gun's orientation. The large circle that surrounds the hull symbol is the compass, as the "N" on that circle points north (and you can derive your general hull and gun cardinal direction from this).
To the right of the hull and compass graphic is the gun and sight LOS graphic, which appears like a tall rectangular box with the bottom 1/4th of it shaded gray. The shaded gray area is below 0 degree elevation (on hull), and the area above is above 0 degree elevation. The bar to the left side of the rectangle is the gun's current elevation.
In both graphics, there is is a dark blue colored area. This dark blue shows where the commander's independent thermal viewer is currently looking. Most of the time it will be in line with the gun orientation, however the commander has the ability to disconnect it with the gunner's LOS, and can independently scan around for targets.
Commander's Observation Pod (CPOD)
The DF30 commander has a fully independent Commander's observation POD (CPOD) that allows the commander to independently scan for targets while the gunner engages targets, or scans the environment.
While in the display unit view, the commander is normally moving the CPOD independent of the gun and must put the CPOD in "destroy mode" for the gun LOS to move to follow the CPOD. When the CPOD is not in destroy mode, the commander can traverse and elevate the CPOD around with mouse or joystick movements. As this occurs, observe that the dark blue markings in the upper left part of the screen's hull/gun orientation graphic will now move independently of the gun.

To bring the gun LOS into alignment with the CPOD, first hold the P key to engage the palm switches, then press UP ARROW or Joystick Button 7. This will place you in destroy mode, which is a fancy name for commander designate mode, and once the gun is in alignment with the CPOD then the commander can move the gun to get on target. Once the gun sight is on target, give control back to the gunner by exiting destroy mode, by again holding P and pressing UP ARROW or Joystick Button 7.
This process allows the commander to designate a target to the gunner, and then the commander can begin scanning the CPOD immediately for a new target to engage, while the gunner is engaging the current one.
Overriding the Gun
The DF30 commander can override the gunner and fire the weapon systems himself. In order for the commander to override and fire the gun, the commander must either:
- put the CPOD in "CTG" mode (Commader-to-Gun)
- OR
- change the DAY or TI CAM to "G" mode (gunner's LOS)
Then the commander must flip up the arming switch located to the right of the Display Unit (the upper most switch on the side wall). Then, while the commander is holding the override P key, the commander will be able to elevate, traverse and fire the gun.

- NOTE: The Display Unit may display "ARM" on the screen even when the commander's switch is not armed. This is because the "ARM" label simply specifies if either the gunner or commander's switch is armed. Therefore, if the "ARM" is displayed when the commander's arming switch is off, then its because the gunner's arming switch is armed.
- NOTE: To the right of the commander's panel, mounted on the engine wall, there is an "OVR" switch. When activated, the display panel will display a red "OVR" but this has nothing to do with overriding the gunner. This is the hatch override, which disables the safety feature that causes the turret to be disabled when the commander's hatch is open. With "OVR" on, the commander can unbutton and the gun will still operate.
Display Unit Modes and Settings
Starting in the upper left of the display unit and going around counter clockwise, the display unit has the following settings and menus, which are consistent between the commander and gunner:
- NOTE: All sub menus are listed, even if not fully modeled, in order to let you know what is currently modeled in SB and what isn't. If a selection is not modeled, then it will either say "not modeled in SB" or "N/A" (not available).
"COMB" (Combat) Menu

(counter clockwise)
- GUN - switches to the 30mm weapon system
- MG - switches to the coaxial MG weapon system
- AP / HE - toggles the 30mm ammo between AP and HE
- SN / BR / FL - toggles the 30mm rate of fire between single (SN), burst (BR), full auto (FL)
- PWR / STAB - toggles between powered traverse but no stabilization (PWR) and full stabilization (STAB), note that this can only be changed in the gunner position (the commander can simply monitor the setting)
- IND / CTG - toggles the commander's CPOD between independent (IND) and gun azimuth (CTG) --Commander-to-Gun, this is useful to quickly swing the CPOD to the gun's azimuth
- DATA - Accesses the Data menu (see below)
- NEXT FLT - N/A
- COMB|MAN - toggles between manual range entered (MAN) or LRF range (COMB)
- FST / LAST - toggles between first and last LRF return
- LWS - Accesses the Laser Warning System menu (see below)
- "-" - This is a context senstive button to toggle upwards between options (see below)
- "+" - This is a context senstive button to toggle downwards between options (see below)
- Zm / Rt / Fc / Ir - These are various selections which determine what the "+" and "-" buttons (located below it) do; essentially whatever is selected here will cause the context sensitive "+" and "-" to quick toggle between applicable settings
- Zm (day mode) - This causes the "+" and "-" buttons (below it) to zoom in and out in continuous zoom; this allows you to get a better look at something in the distance
- Rt - This causes the "+" and "-" buttons (below it) to toggle reticle color
- Fc - This causes the "+" and "-" buttons (below it) to increase or decrease focus (but is only available when in manual focus mode); you have to hold down the "+" or "-" button to focus
- Ir - Not modeled in SB
- [VW] / W / N - Toggles between Very Wide [day mode], Wide and Narrow FOV
- G / C (TI) - Puts the display unit in thermal mode, and toggles between Gunner and Commander LOS
- G / C / L (DAY) - Puts the display unit in day mode, and toggles between Gunner and Commander LOS, or puts the view in low light mode (gunner's LOS)
"DATA" Menu

(counter clockwise)
- MAN RNG - Accesses the Manual Range menu (see below)
- OPEN / URB - ...
- AMMOPROP - Accesses the Ammunition Properties menu (see below)
- CAM PROP - Accesses the Camera Properties menu (see below)
- BS - Accesses the Battlesight menu (see below)
- IND / CTG - toggles the commander's CPOD between independent (IND) and gun azimuth (CTG), this is useful to quickly swing the CPOD to the gun's azimuth
- BALSTC - Toggles the display on/off of the current ballistic data
- MINRNG - Accesses the Manual Range menu (see above), but instead will enter the minimal range that you want the FCS to accept
- COMBAT - Returns to Combat menu (see above)
- FULLSCR - Puts the display unit in full screen mode, which removes all the clutter around the view (go back to "COMBAT" to exit full screen mode)
- MAINT - Accesses the Maintenance menu menu (see below)
- DRIFT - Begins an automated process that removed drift from the controls
- AMMO T - Accesses the Ammo Temperature menu, which is nearly identical to the Manual Range menu, but where you can set the vehicle's internal ammo temperature for greater accuracy in ballistic solutions (this is not something that is necessary to do in SB)
- ALT - Accesses the Altitude menu, which is nearly identical to the Manual Range menu, but where you can set the vehicle's altitude for greater accuracy in ballistic solutions (this is not something that is necessary to do in SB)
- AIR T - Accesses the Air Temperature menu, which is nearly identical to the Manual Range menu, but where you can set the outside air temperature level for greater accuracy in ballistic solutions (this is not something that is necessary to do in SB)
- WIND - Accesses the Wind menu, which is nearly identical to the Manual Range menu, but where you can set the crosswind speed for greater accuracy in ballistic solutions (this is not something that is necessary to do in SB)
"MAN RNG" (Manual Range) Menu

(counter clockwise)
- 1 - Enters "1" into the manual range entry
- 2 - Enters "2" into the manual range entry
- 3 - Enters "3" into the manual range entry
- 4 - Enters "4" into the manual range entry
- 5 - Enters "5" into the manual range entry
- 6 - Enters "6" into the manual range entry
- ENTER - Enters whatever manual range you have selected into the ballistic computer
- DATA - Accesses the Data menu(see below)
- COMBAT - Returns to Combat menu (see above)
- FULLSCR - Puts the display unit in full screen mode, which removes all the clutter around the view (go back to "COMBAT" to exit full screen mode)
- <- - Moves the entry back one space to the left, if you made a mistake you can use this to go back and enter a new digit
- 0 - Enters "0" into the manual range entry
- 9 - Enters "9" into the manual range entry
- 8 - Enters "8" into the manual range entry
- 7 - Enters "7" into the manual range entry
"AMMOPROP" (Ammunition Properties) Menu
- MGZ 1 - Selects 30mm ammo slot 1 for data entry
- MGZ 2 - Selects 30mm ammo slot 2 for data entry
- MG MGZ - Selects coaxial MG for data entry
- GUN JMP - Shows the gun jump data
- B GUN JMP - Shows the B gun jump data
- TWISTANG - N/A
- ENTER - Enters whatever data you just changed
- DATA - Accesses the Data menu (see above)
- COMBAT - Returns to the Combat menu (see above)
- # RND - Accesses the # RND menu, which is nearly identical to the Manual Range menu, but where you can set the number of rounds of the selected ammo slot (MGZ 1,MGZ 2,MG MGZ) so that the computer has the correct data, such as when you just reloaded ammunition
- MGZFULL - When you select either MGZ 1, MGZ 2, MG MGZ, then select this, and press ENTER, it will reset the ammo counter to maximum for that ammo type (useful as a quick way to reset ammo count after reloading)
- ABM - When you select either MGZ 1, MGZ 2, then select this, and press ENTER, it will specify that the ammunition is an ABM ammo type
- TP - When you select either MGZ 1, MGZ 2, then select this, and press ENTER, it will specify that the ammunition is a TP ammo type
- HE - When you select either MGZ 1, MGZ 2, then select this, and press ENTER, it will specify that the ammunition is an HE ammo type
- AP - When you select either MGZ 1, MGZ 2, then select this, and press ENTER, it will specify that the ammunition is an AP ammo type
"CAM PROP" (Camera Properties) Menu

(counter clockwise)
- ON / OFF (RETICLE) - Toggles the reticle on and off
- W / B / COL (RETICLE) - Toggles the reticle between white, black, and red color
- W / B (HOT) - Toggles the thermal sight between white and black hot (only available in thermal mode)
- AUTO / MAN (FOCUS) - Toggles between auto and manual focus
- AUTO / MAN (IRIS) - N/A
- RESET - N/A
- DATA - Accesses the Data sub-menu (see above)
- COMBAT - Returns to the Combat menu (see above)
- NUC - N/A
- GAMMA - N/A
- AUTO / MAN (GAIN) - Toggles between auto and manual gain (currently not modeled in SB)
- "-" - This toggles GAIN or LEVEL upwards, depending on which is selected (currently not modeled in SB)
- "+" - This toggles GAIN or LEVEL downwards, depending on which is selected (currently not modeled in SB)
- GAIN - N/A
- LEVEL - N/A
- G / C (TI) - Puts the display unit in thermal mode, and toggles between Gunner and Commander LOS
- G / C / L (DAY) - Puts the display unit in day mode, and toggles between Gunner and Commander LOS and low light camera (Gunner LOS)
"BS" (Battlesight) Menu
- NOTE: This menu is non-simulated and is present only to display the boresight data values
(counter clockwise)
- LRF - Displays the LRF boresight data
- G DAY - Displays the Gunner's day sight boresight data
- G TI - Displays the Gunner's thermal imager boresight data
- BS MG - N/A
- LEFT - N/A
- ENTER - N/A
- ABORT - N/A
- DATA - Accesses the Data sub-menu (see above)
- COMBAT - Returns to the Combat menu (see above)
- FOCUS + - N/A
- FOCUS - - N/A
- RESET BS - N/A
- RIGHT - N/A
- DOWN - N/A
- UP - N/A
- VW / W / N - Displays what FOV the sight is currently in
- C TI - Displays the Commander's thermal imager boresight data
- C DAY - Displays the Commander's day sight boresight data
"MAINT" (Maintenance) Menu
(counter clockwise)
- BIT - N/A
- FAILLIST - Displays a list of system failures, which is useful when the fire control system suffers damage
- SOFTVER - Displays the currently modeled firware version of the fire control system
- ON/OFF - Goes to the FCS subsystem menu to allow you to turn various features on and off
- C TI - Toggles Commander's Thermal Imager on/off
- G TI - Toggles Gunner's Thermal Imager on/off
- LWS - Toggles the Laser Warning System on/off
- LRF - Toggles the Laser Range Finder on/off
- IMS - N/A
- BACK - Returns to the MAINT menu
- DATA - Accesses the Data menu (see above)
- COMBAT - Returns to Combat menu (see above)
- G DAY - Toggles Gunner's day sight on/off
- C DAY - Toggles Commander's day sight on/off
- CALIB - N/A
- BACK - Returns to the Data menu (see above)
- DATA - Accesses the Data menu (see above)
- COMBAT - Returns to Combat menu (see above)
- BCKUPEDS - N/A
- BCKUPFCS - N/A
- RSTOREDS - N/A
- RSTORFCS - N/A
- FOLDING - N/A
- UNFOLD - N/A
"LWS" (Laser Warning System) Menu

In the center of the LWS menu is a similar hull and gun graphic to the standard one in the Combat menu. The box with triangle represents the hull, while the line represents the gun facing in relation to the hull. Additionally, if a lase is "received", then a yellow arc will show the general direction / quadrant where the laser was emitted from. In this way, you can look in the general direction of the event to locate the source of the emission.
- NOTE: Normally the commander's sight does not move towards the direction of the lase, but this can be adjusted on the commander's computer panel.
(counter clockwise)
- NEXT - Goes to the next LWR even (if there is more than one)
- PREVIOUS - Goes to the previous LWR even (if there is more than one)
- BRINGTO - Brings the CPOD towards the currently selected laser threat.
- DATA - Accesses the Data menu (see above)
- COMBAT - Returns to the Combat menu (see above)
- IR - Specifies that the received laser is an Infra Red countermeasure type (not modeled in SB)
- BR - Specifies that the received laser is a Beam Rider type
- DSGT - Specifies that the received laser is a Designator type
- LRF - Specifies that the received laser is a Laser Range Finder type
- # - Shows the number of LWR events
- ATBRING - Puts the LWS in automatic mode, which brings the commander's CPOD automatically towards the laser threat the moment it happens (note that the mode is disabled once the event occurs, so you will have to re-enable it again if you want it to react automatically to the next threat)
Commander's Vision Block View

On some occasions the TC may need to look around the vehicle without having to spin the turret and without having to expose himself to hostile fire. The vision block view allows the TC to remain safely inside the vehicle and quickly scan around for close threats. Access the TC's vision block view by pressing F4.
Once in the vision block view, the mouse or joystick can be used to quickly and seamlessly pan the TC's view from vision block to vision block, allowing him to scan around the vehicle. While the vision block view completely protects the TC from hostile fire, it does have an extremely limited field of view and offers no magnification.
Key listing for DF30's Commander's Position
General Commands:
TAB: Pop smoke. Instructs the gunner to launch smoke grenades to deploy a smoke screen in the direction that the turret is facing. Useful for breaking up enemy LRF or completely obscuring your vehicle against a non thermal sight equipped threat.
Q: Raise position in hatch. Moves the TC's view and exposure level up in the hatch.
Z: Lower position in hatch. Moves the TC's view and exposure level down in the hatch.
B: Button and unbutton the hatch (toggle). This is used to close and open the hatch.
+ (num pad): Thermal mode (toggle). This toggles the thermal view on and off on the display unit.
UP ARROW : While also holding P, enters "destroy mode" and designates a target to the gunner which causes the turret to slew to the direction that the CPOD is facing.
U: Dismounts all infantry that are currently mounted in the vehicle.
SHIFT + U: Mounts all infantry currently dismounted back into the vehicle.
Driver related commands:
SHIFT + BACKSPACE: Shut down / start up engine (toggle). Orders the driver to shut off or start up the engine. If the TC is a platoon leader then it orders the platoon to execute a "short count" and simultaneously shut down or start up their engines.
W: Driver, move out. Instructs the driver to move forward (press again for increased speed.
S: Driver, stop. Instructs the driver to stop.
X: Driver, backup. Instructs the driver to reverse.
A: Driver, go left. Instructs the driver to go left (hold the key).
D: Driver, go right. Instructs the driver to go right (hold the key).
Gunner related commands:
SPACE BAR: Fire. Orders the gunner to fire at a target he is looking at.
SHIFT + SPACE: Instruct the gunner to "fire and adjust", that is to engage a target and continue to engage as necessary.
H: Hold fire. Orders the gunner to hold fire. If the TC is a platoon leader then it will also order the platoon to hold fire.
F: Fire at will. Orders the gunner to fire at will. If the TC is a platoon leader then it will also order the platoon to fire at will.
E: Engage. Orders the gunner to engage, and instructs the driver to take up a battle position. If the TC is a platoon leader then it orders the platoon to engage and take up a battle position in the direction of the user's view.
M: Coax / Main gun (toggle). Orders the gunner to toggle between the main gun and coax to engage targets.
SHIFT + LEFT ARROW: Gunner, scan left. Orders the gunner to put move the turret approximately 45 degrees to the left and scan for targets.
SHIFT + RIGHT ARROW: Gunner, scan right. Orders the gunner to put move the turret approximately 45 degrees to the right and scan for targets.
SHIFT + UP ARROW: Gunner, scan front. Orders the gunner to put the gun over the front and scan for targets.
INSERT: Fire, fire (ammo type 1, usually sabot/KE). Orders the gunner (who controls the autoloading mechanism) to switch to ammo type 1 after the next round is fired. Holding SHIFT and pressing this key will instruct the gunner to reload this round type from stored areas in the turret.
DELETE: Fire, fire (ammo type 2, usually HEAT). Orders the gunner (who controls the autoloading mechanism) to switch to ammo type 2 after the next round is fired. Holding SHIFT and pressing this key will instruct the gunner to reload this round type from stored areas in the turret.
END: Fire, fire (ammo type 3, usually HE). Orders the gunner (who controls the autoloading mechanism) to switch to ammo type 3 after the next round is fired. Holding SHIFT and pressing this key will instruct the gunner to reload this round type from stored areas in the turret.
SHIFT + PAGE DOWN: Reload all. Orders the tank crew to reload all weapons systems.
Gunner's Position F6
In Steel Beasts the gunner's position on the DF30 is fully crew-able and fully modeled. The gunner's position is accessed by pressing F6.
From this position the user can raise and lower their perspective (and exposure level) by holding the Q key (to go up) and the Z key (to go down). The gunner can also button or unbutton (close and open the gunner's hatch) by pressing the B key (toggle).


Gunner's Display Unit
This gunner's display unit functions as the gunner's primary sight and is essentially identical to the commander's display panel. See the commander's display unit section for details about the various menus.
The gunner display unit can be accessed by pressing F2.

The gunner's display has three levels of magnification, very wide (VW), wide (W) and narrow (N).
The gunner can also toggle the display from day and thermal view using the MFD or by pressing NUM PAD +.

Sight Symbology
In the center of the gunner's display, the sight will be visible depending on the current level of magnification. In both the VW and W field of view, the sight will have brackets which represent the field of view of the narrow magnification level, and a cross in the center to mark the location of the narrow magnification's aiming reticle.

The GPS main gun aiming reticle is used for aiming at the target. The reticle consists of a center crosshair, and a series of surrounding vertical and horizontal lines (veterans of the Centauro and various Elbit type RWS will recognize that it is the same common reticle pattern).
Vehicle compass
Vehicle compass with yellow arc showing the general direction it received a lase from
In the upper left of the screen are a series of icons and symbols. The box with a triangle on top is the vehicle's hull (as if looking down from above). The circle in the middle of the box represent the turret, while the long line that extends from the center of the circle is the gun's orientation. The large circle that surrounds the hull symbol is the compass, as the "N" on that circle points north (and you can derive your general hull and gun cardinal direction from this).
To the right of the hull and compass graphic is the gun and sight LOS graphic, which appears like a tall rectangular box with the bottom 1/4th of it shaded gray. The shaded gray area is below 0 degree elevation (on hull), and the area above is above 0 degree elevation. The bar to the left side of the rectangle is the gun's current elevation.
In both graphics, there is is a dark blue colored area. This dark blue shows where the commander's independent thermal viewer is currently looking. Most of the time it will be in line with the gun orientation, however the commander has the ability to disconnect it with the gunner's LOS, and can independently scan around for targets.
Engaging Targets
Engaging targets with the GPS is relatively simple in the DF30. Obviously the first thing you need to do to engage a target is to acquire it. The best way to do this is by instruction from the TC or by scanning with the GPS sight itself.
Lasing

Once a target is acquired, make sure the weapon is armed (the switch to the top right of the display screen should be up, and "ARM" should be shown on the upper right of the screen). The gunner should lase the target to get the range to it. To do this, the gunner must utilize the GPS reticle.
When the target is in the center of the narrow view's GPS reticle (the central cross), lase the target by pressing CTRL or Joystick Button 2.
Once you lase the target the fire control system will elevate the gun to the appropriate position so as to accommodate for the ballistic trajectory at that range and currently loaded round type. Also, the lased range will appear in the upper left of the gunner display, next to the "RANGE:" text. Also, "LAS" will be displayed to the right of the range to signify that the range is from a laser return.

Firing
After a target has been lased, the gun is ready to be fired. To fire the main gun press SPACEBAR or Joystick Button 1. The round will now be launched down range and the enemy will hopefully be rewarded with a quick and painless death.
Note that you can left click on the "F5" MFD button to toggle the rate of fire between "SN" single, "BR" brust and "FL" full (auto) for the 30mm gun, and between "BR" and "FL" for the MG.

Gunner's display, reticle on target, range 1915m, rate of fire in "BR" (burst mode)

Fire! Target! Cease Fire!


Lead
Lead is the term used to refer to putting a gun in front of a target which is moving perpendicular to your vantage point. When you lead a target, you essentially need to fire in front of target at the point in which the round and target will meet. The DF30 has automatic lead, so determining lead is relatively easy.
To calculate lead, put the reticle on target and lase. Then track the moving target and press the O key to initiate the auto track mode. Once auto track mode is active, a flashing set of brackets will appear around the reticle and the gun will track the target. While the gun is tracking, you can adjust the EL and AZ movement to change the aim point on the moving target (perhaps to get a better center of mass sight picture).
At this point, when you fire, you will have lead applied to the shot.
Reengaging
If by some chance you miss the target, first and foremost you need to reload another round. Next, place the reticle back on the target and re-lase and check that the range is longer (if the round fell short) or shorter (if the round was long).
Engaging with the Coaxial Machine Gun
To engage with the coaxial MG, simply select the "MG" on the MFD (button F2), or press the M key to select the machine gun. Then lase and engage the target as you would with the main gun.
- The Main / Coax M key toggle only functions if you are also in the "COMB" menu on the gunner's display panel, since the toggle key represents you pressing the appropriate F key on the MFD to select the other weapon system, which is only available in the "COMB" menu.
- The weapon will be put on safe when you swap between weapon systems, this is a safety feature in the fire control system.
- The Main / Coax M key toggle only functions if you are also in the "COMB" menu on the gunner's display panel, since the toggle key represents you pressing the appropriate F key on the MFD to select the other weapon system, which is only available in the "COMB" menu.
Gunner's Side Vision Blocks
Like the TC's position, the gunner has vision blocks which can be used as a way to look around the vehicle from safety. The vision block is located above and to the right of where the gunner is sitting. It is accessed by left clicking the mouse on it in the interior view, or by pressing F4.

Key listing for DF30 gunner's position
Weapon system commands:
V: Load the main gun. This button instructs the auto-loader mechanism to load a main gun round.
P or Joystick Button 3: Release palm switches. This disengages the hydraulics and stops movement of the gun and turret.
SPACE BAR: Fire main gun. Fires the main gun (coax uses a separate key).
M: Main / Coax (toggle). Toggles between the main gun and coax.
- The Main / Coax toggle only functions if you are also in the "COMB" menu on the gunner's display panel, since the toggle key represents you pressing the appropriate F key on the MFD to select the other weapon system, which is only available in the "COMB" menu.
- The weapon will be put on safe when you swap between weapon systems, this is a safety feature in the fire control system.
- The Main / Coax toggle only functions if you are also in the "COMB" menu on the gunner's display panel, since the toggle key represents you pressing the appropriate F key on the MFD to select the other weapon system, which is only available in the "COMB" menu.
SHIFT + SPACEBAR: Master blaster. Fires the main gun manually which is useful in situations where where the gun does not respond or when electrical power to the turret is lost.
CTRL: Lase. Lases the target or area currently in center of the reticle.
`: Range toggle (toggle). Toggles between lase return range and combat (battlesight) range.
INSERT: Select KE. Selects KE on the display panel and also designates that the commander should load a KE round when you press V.
DELETE: Select HESH. Selects HESH on the display panel and also designates that the commander should load a HESH round when you press V.
/: Manual mode. Puts the fire control system in manual mode.
.: Emergency mode. Puts the fire control system in emergency mode. This essentially slaves the sight to the gun and disables all form of lead and stabilization. This is necessary when the fire control system suffers a malfunction.
- If the fire control system suffers a malfunction or stabilization is lost while in normal mode then emergency mode must be selected in order traverse the turret.
,: Normal mode. Puts the fire control system in normal mode. This is the normal operating mode for the fire control system and essentially slaves the gun to the sight. Normal mode must be selected to have a stabilized gun sight and lead calculation.
Commander related commands:
T: Identified! Tells the commander that you have located a target and that you are going to engage it. Essentially it tells the AI commander to leave you alone while you engage and forbids the AI from overriding you to another target. Use at your own risk.
I: I can't see it! Tells the commander that you cannot see a target or the one he is commanding you to engage. Essentially it tells the AI commander to override you on to a target that it wants you to engage.
Driver related commands:
W: Driver, move out. Instructs the driver to move forward (press again for increased speed.
S: Driver, stop. Instructs the driver to stop.
X: Driver, backup. Instructs the driver to reverse.
Driver's Position F9
In Steel Beasts the driver's position on the DF30 is fully crew-able but partially modeled. There is a 3D view for the driver but there are no functional switches or gauges in the driver's position. The driver's position is accessed by pressing F9.

Driver's buttoned view
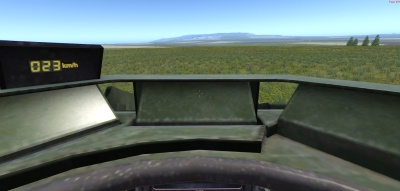
Driver's unbuttoned view


Once in the driver's position, you can drive the tank by using the joystick or "W, A, S, D, X" keys. You can also unbutton the driver and raise his view by holding Q and you can lower the driver and make him button up by holding Z.
While unbuttoned, the driver on the driver has a speedometer available on the exterior of the vehicle.
Reference
Links:
Purchase SB Pro PE
--Volcano 02:01, July 25, 2019 (UTC)