
Connaugh
-
Posts
687 -
Joined
-
Last visited
-
Days Won
1
Content Type
Forums
Events
Downloads
Articles
Files posted by Connaugh
-

DEFENSE OF PUERTO NATALES
DEFENSE OF PUERTO NATALES: OPERATION SOBERANIA II
By Connaugh
Operación Soberanía (Operation Sovereignty) was a planned Argentine military invasion of Chile due to the Beagle conflict.
The invasion was initiated on 22 December 1978 but was halted after a few hours and Argentine forces retreated from the conflict zone without a fight.
The Fifth Army Corps was to seize Puerto Natales, the largest of two cities of the Chilean Magallanes Region.
SITUATION:
Argentina's present government has made plans to initiate Operation Soberania II and capture Puerto Natales.
EXECUTION:
The Chilean 25th Mechanized Infantry is to defend the border crossings at Cerro Dorotea and Casas Viejas.
The 5th Armored Brigade is to advance from Punta Arenas to defend the city of Puerto Natales.
FORCES:
Chilean Forces:
5th Armored Brigade 4 x Leopard 2A4
3 x M113A1 with Infantry and Anti-Tank Weapons.
25th Mechanized Infantry 2 x Leopard 2A4 Tanks
Infantry with Anti-Tank Weapons.
Argentina Forces include TAM VC Tanks and TAM VCTP Infantry Fighting Vehicles.
Scenario ends when either Puerto Natales is captured or all enemy AFV's are non-operational.
Scenario takes 25 minutes to play.
Map embedded in Scenario.
38 downloads
(1 review)0 comments
Submitted
-

The Defense of Neutral Moresnet
The Defense of Neutral Moresnet
By Connaugh
Neutral Moresnet was a small Belgian–Prussian condominium in western Europe that existed from 1816 to 1920 and was administered jointly by the United Kingdom of the Netherlands and the Kingdom of Prussia. It was 1.5 kilometers (1 mi) wide and five kilometers (3 mi) long. After 1830, the territory's northernmost border point at Vaalserberg connected it to a quadripoint shared additionally with the Dutch Province of Limburg, the Prussian Rhine Province, and the Belgian Liège Province. When Belgium gained its independence from the Netherlands in 1830, the Belgians assumed control of the Dutch role in Neutral Moresnet (though the Dutch never formally ceded their claim).
SITUATION:
The Irredentist Party has gained control of the government of the Netherlands and has ordered its Armored Forces to invade Neutral Moresnet and acquire it by force with the expectation that the international community will grant the Netherlands “de facto” ownership. The government of Belgium strongly protests this action.
EXECUTION:
Belgian Forces (1/3 Lancers) are to advance into Neutral Moresnet to defend the town of Kelmis from capture.
FORCES:
Belgium: Leopard 1A5 x 4
Piranha-IIIC x 4 (with Spike Anti-Tank Missile Teams)
Netherlands Forces include Leopard 2A6 tanks and CV90/35-NL PC’s.
Scenario ends when all enemy AFV’s are not operational or Kelmis is captured.
Scenario takes about 20 minutes to play.
59 downloads
(0 reviews)0 comments
Updated
-

A STORM UPON ULSTER
A STORM UPON ULSTER: THE WAR OVER DONN CUAILNGE
by Connaugh
Connacht has become embroiled in a resource conflict with the province of Ulster over possession of Donn Cuailnge, the brown bull of Cuailnge. Along with the other provinces of Ireland: Munster, Meath, and Leinster, Connacht has marshaled the combined forces for an assault on Ulster.
SITUATION:
The Armored Forces of Connacht, Munster, Meath, and Leinster have assembled on the border with Ulster, ready to invade.
EXECUTION:
Initial objectives of Iraird Cuillenn, Ath Gabla, and Emain Macha are to be assaulted and captured. Then, the forces are to combine for the assault and capture of Cuailnge.
FORCE COMPOSITION:
Connacht: 2 x M60A3, 1 x M113A1
Munster: 2 x M60A3, 1 x M113A1
Meath: 2 x M60A3, 1 x M113A1
Leinster: 2 x M60A3, 1 x M113A1
Artillery: 1 Battery of 3 Tubes
CSS of Repair, Medical, and Supply
Each M113A1 consists of an Infantry Team, LMG Team, and M47 Dragon Missile Team
Ulster Forces are comprised of T-62 tanks, BTR-70 PC's, and Infantry with anti-tank weapons.
Artillery is expected.
Message will be generated when an objective is captured.
Victory points earned only when Infantry capture the objective and the capture of the Brown Bull of Cuailgne (appears as a mini-bus).
Map embedded in scenario.
Playing time 90+ minutes.
Scenario ends when all four objectives are captured, no enemy Tanks operational, and the Brown Bull, Donn Cuailnge is captured (mini-bus immobilized)
Scenario inspired by the Irish Epic "Tain Bo Cuailnge".
67 downloads
(0 reviews)0 comments
Updated
-

CYPRUS - THE REUNIFICATION
CYPRUS: THE REUNIFICATION
By Connaugh
On 15 July 1974, the Greek military junta carried out a coup d'état in Cyprus, to unite the island with Greece with the result that Turkey invaded the island, citing a right to intervene to restore the constitutional order from the 1960 Treaty of Guarantee. After a ceasefire, Turkey landed more troops and occupied over a third of the island, resulting in a UN Buffer Zone dividing Greek-controlled Cyprus from the newly created Turkish REPUBLIC OF NORTHERN CYPRUS.
SITUATION:
Turkey has now ordered its Armored Forces to be carried by heavy transport to Cyprus to occupy the entire island.
EXECUTION:
The 2nd Armored, 3rd Armored, and 66th Mechanized Brigades are to advance to the capital, NICOSIA, which is divided by the UN Buffer Zone, and capture the southern half of the city under Greek control. After capturing Nicosia, the towns of PAPHOS, LIMASSOL, AND LARNACA are to be captured.
FORCES:
2nd Armored Brigade 1 x Leopard 2A4 Tank Platoon
3rd Armored Brigade 1 x Leopard 2A4 Tank Platoon
66th Mechanized Brigade 2 x M113A1 Platoons (Infantry, LMG, ATGM team)
CSS of Repair, Medical, and Supply
Greek National Guard forces are comprised of Leopard 1A5 and M60A3 tanks
and Infantry with anti-tank weapons. Greece is expected to respond to any invasion
with a rapid-response force.
NOTES:
Heavy Transport will land the Turkish Armored Force at Kyrenia and the CO can assign vehicles to players.
Once the UN Buffer Zone is crossed, UK Forces in Cyprus will become a belligerent.
Scoring based on capturing Nicosia, Paphos, Limassol, Larnaca and destroying all enemy Tanks.
Mech Infantry must be in objective to capture.
Greek Forces vary in location and reaction depending on Turkish Player selection of advance routes to add to replay value of scenario.
Scenario takes 60+ minutes to play.
Map embedded in Scenario.
88 downloads
(0 reviews)0 comments
Updated
-

GIBRALTAR – THE RECONQUISTA
GIBRALTAR – THE RECONQUISTA
By Connaugh
SITUATION:
Spain claims Gibraltar, a 6-square-kilometre Overseas Territory of the United Kingdom in the southernmost part of the Iberian Peninsula. Then a Spanish town, it was conquered by an Anglo-Dutch force in 1704 during the War of the Spanish Succession on behalf of Archduke Charles, pretender to the Spanish throne.
The legal situation concerning Gibraltar was settled in 1713 by the Treaty of Utrecht, in which Spain ceded the territory in perpetuity to the British Crown stating that, should the British abandon this post, it would be offered to Spain first. Since the 1940s Spain has called for the return of Gibraltar.
Spain has now ordered its Armored Forces to cross the border and take possession of Gibraltar.
EXECUTION:
The Extremadura and Cantabria Brigades are to capture the following objectives and defend Gibraltar from any attempt of the UK to retake the peninsula:
Airport
Terminal
Town
Gun Batteries
Lighthouse
FORCES:
1/Extremadura 3 x Leopard 2A5 Tanks
2/Extremadura 3 x Leopard 2A5 Tanks
1/Cantabria 3 x Pizarro F1 IFV
2/Cantabria 3 x Pizarro F1 IFV
U.K. Garrison Forces are reported to have Chieftain Tanks and Infantry with Anti-Tank weapons.
A message will be generated when an objective is captured.
Mech Infantry must be used to capture an objective.
Scenario takes approximately 45 minutes to play.
Unzip GIBRALTAR – THE RECONQUISTA and save in your Scenario Folder
Unzip CONNAUGH – GIBRALTAR A and save in your Maps Folder
154 downloads
(0 reviews)0 comments
Updated
-

MITLA PASS – SUEZ CRISIS 1956
MITLA PASS – SUEZ CRISIS 1956
By Connaugh
SITUATION:
On 26 July 1956, Nasser nationalised the Suez Canal. On 29 October, Israel invaded the Egyptian Sinai. The IDF chief of staff, General Moshe Dayan, first planned to block the vital Mitla Pass. Dayan planned for the Battalion 890 of the Paratroop Brigade to drop near one of the defiles of the pass, Jebel Heitan. The rest of the brigade, under the command of Colonel Ariel Sharon would then advance to meet with the battalion, and consolidate their holdings.
MISSION:
The Paratrooper Force is to land near the Heitan Defile and capture it. 202 Brigade will advance and secure the Mitla Defile and hold it against any Egyptian Counterattacks.
EXECUTION:
Paratroopers are to land on either side of the Heitan Defile and maneuver their LMG and infantry teams to clear the Egyptian trenches.
After the Heitan Defile is captured, 202 Brigade will arrive and the tank platoon is to capture the Mitla Defile. The PC platoon is to set up infantry and ATGM teams for defense.
FORCE COMPOSITION:
Paratroopers 1 Infantry Platoon with LMG teams.
202 Brigade 3 x Shot Kal Tanks
4 x ASLAV PC’s with Dragon ATGM teams
Egyptian Force consists of T-55A tanks and BTR-50PK PC’s.
Mission Score dependent on capturing the Heitan Defile, the Mitla Defile
And destroying all Egyptian AFV’s.
Message will be generated when objective is captured.
Scenario takes about 35 minutes to play.
Unzip MITLA PASS – SUEZ CRISIS 1956 and save in your Scenarios Folder
Unzip CONNAUGH – MITLA and save in your Maps Folder.
234 downloads
-

JUNO BEACH D-DAY
JUNO BEACH - D-DAY
By Connaugh
SITUATION:
At the beginning of the Battle of Normandy, the 3rd Canadian Infantry Division, landed on Calvados coast. Saint-Aubin-sur-Mer, one of five Canadian landing sites, was located at the eastern end of Canada's assigned landing sector of Juno Beach. On D-Day, the 8th Canadian Infantry (Assault) Brigade (Group) stormed the beach, landing The North Shore (New Brunswick) Regiment, the 10th Armoured Regiment (The Fort Garry Horse). The Canadians were met by about 100 defenders who garrisoned the town's fortified 'Resistance Nest'. The Germans were largely unaffected by the preparatory barrage, as such they were able to put up heavy resistance at the beach and in the town, for most of the day, as the Canadians pushed inland.
MISSION:
Saint-Aubin-sur-Mer must be captured and held against any counter-attacks.
EXECUTION:
The 10th Armored Regiment tanks will disembark from their LST directly on the beach at Saint-Aubin-sur-Mer and breach the minefield and steel beam obstacles. The amphibious DD tanks of the 10th Armored and the 8th Canadian Infantry, disembarking from their landing craft, will make their way through the cleared lanes and capture Saint-Aubin-sur-Mer.
COMPOSITION OF FORCES:
10th Armored Regiment: 3 x M60A3 Tanks with Plows
2 x M60A3 Tanks with Rollers
10th Canadian Armored- DD Tanks 3 x PT76 Tanks
8th Canadian Infantry 4 x M113 Landing Craft with Infantry and LMG Teams.
Artillery 1 battery of 3 tubes
German Armor consists of Leopard AS1’s and AMX13-75’s.
And Infantry in ASLAV-PC’s.
VICTORY CONDITION:
Saint-Aubin-sur-Mer must be captured and all German AFV’s destroyed.
Scenario takes about 25 minutes to play.
Unzip JUNO BEACH D-DAY and save in your Scenarios Folder
Unzip CONNAUGH - JUNO BEACH and save in your Maps Folder.
155 downloads
(0 reviews)0 comments
Updated
-

War of the Oranges: Portugal - Spain
WAR OF THE ORANGES: PORTUGAL - SPAIN
The town of Olivenza was under Portuguese sovereignty almost continuously between 1297 (Treaty of Alcañices) and 1801, when it was occupied by Spain during the War of the Oranges, so-named because Generalissimo Godoy sent oranges picked outside of Elvas to the Queen of Spain, and ceded that year under the Treaty of Badajoz. Spain has since administered the territory, whilst Portugal invokes the self-revocation of the Treaty of Badajoz, plus the Treaty of Vienna of 1815, to claim the return of the territory. In spite of the territorial dispute between Portugal and Spain, the issue has not been a sensitive matter in the relations between these two countries. Portugal has never made a formal claim to the territory after the Treaty of Vienna, but neither has it directly acknowledged Spanish sovereignty over Olivenza.
SITUATION:
The Irredentist Party has gained control of the government and has ordered its military forces to advance into Spain and occupy Olivenza with the intention that international pressure will force Spain to cede Olivenza back to Portugal.
MISSION:
Portuguese Armored Forces are to occupy Olivenza and defend it from any Spanish counter-attacks.
COMPOSITION OF FORCES:
PORTUGAL:
Grupo de Carros 2 x Leopard 2A6 Platoons
Batalhao de Infantaria 2 x M113A1 Platoons (with Javelin ATGM)
1 x Artillery Battery of 3 tubes
SPAIN:
Leopard 2E tanks
Centauros
Pizarros
VICTORY CONDITIONS:
Portugal wins if it destroys all Spanish AFV’s.
Spain wins if it occupies Olivenza.
Scenario takes about 40 minutes to play.
Unzip WAR OF THE ORANGES and save in your Scenarios Folder
Unzip CONNAUGH - OLIVENZA and save in your Maps Folder
162 downloads
(0 reviews)0 comments
Updated
-

PEGASUS BRIDGE
PEGASUS BRIDGE
by Connaugh
SITUATION:
Allied forces have landed on the Normandy beaches.
Two bridges over the Caen Canal and the Orne River must be taken to prevent the rapid deployment of German reserves against the seaborne landings.
MISSION:
D Company, 6th British Airborne, carried in UH-60 Blackhawk Helicopters, is to capture the bridge over the Canal de Caen (Pegasus) next to Benouville and the bridge over the Orne River leading to Ranville and hold them against any armored counter-attacks until relieved by the 7th Armored.
EXECUTION:
1st, 2nd, and 3rd Squads are to capture and hold the Canal (Pegasus) Bridge.
4th and 5th Squads are to capture and hold the Ranville Bridge.
FORCE COMPOSITION:
D Company Squads consist of Infantry sections, LMG teams, and Dragon ATGM teams.
7th Armored consists of a M60A3 tank platoon.
Message will be generated when an objective is captured.
Scoring based on eliminating all enemy AFV’s.
NOTES:
Unzip PEGASUS BRIDGE and save in your scenarios folder.
Unzip CONNAUGH – PEGASUS BRIDGE and save in your maps folder.
133 downloads
(0 reviews)0 comments
Submitted
-

ST. NAZAIRE RAID
ST. NAZAIRE RAID by Connaugh
The St Nazaire Raid or Operation Chariot was a British amphibious attack on the heavily defended Normandie dry dock at St Nazaire in German-occupied France during the Second World War. The operation was undertaken by the Royal Navy (RN) and British Commandos. St Nazaire was targeted because the loss of its dry dock would force any large German warship in need of repairs, such as Tirpitz, sister ship of Bismarck, to return to home waters by running the gauntlet of the Home Fleet of the Royal Navy and other British forces, via the English Channel or the North Sea.
The obsolete destroyer HMS Campbeltown, accompanied by Motor Launches, carrying Infantry, and Motor Gun Boats, crossed the English Channel to the Atlantic coast of France and was rammed into the Normandie dock gates. The ship had been packed with delayed-action explosives, well hidden within a steel and concrete case, that detonated later that day, putting the dock out of service until 1948.
Force Composition:
Group 1: 3 x Motor Launches (M113A1), 1 x Motor Gun Boat (PT76)
Group 2: 3 x Motor Launches (M113A1), 1 x Motor Gun Boat (PT76)
Group 3: 3 x Motor Launches (M113A1), 1 x Motor Gun Boat (PT76)
HMS Campbeltown: 1 x Destroyer (ASLAV-PC) with Infantry.
HMS Tynedale: 1 x Destroyer (105mm Gun)
Each Group is comprised of Infantry with Anti-tank weapons, LMG Teams, and M47 Dragon ATGM teams.
Objectives:
Group 1: Capture the Old Mole, the Power Station,
and destroy the Avant Port Bridge.
Group 2: Capture the Winding Station, the Lock,
and destroy the Lock Bridge.
Group 3: Capture the Pump House, the Storage tanks,
and destroy the Basin Bridge.
HMS Campbeltown: Ram the Normandie Dock Gate and destroy the gate.
Execution:
The amphibious force of Motor Launches (M113A1), supported by Motor Gun Boats (PT76), will disembark infantry to clear out Enemy positions,
capture the assigned objectives, set demolition charges to destroy bridges, and prepare for armored counter-attacks with the ATGM Teams.
The HMS Campbeltown will ram the Normandie Dock Gate, disembark its infantry and assist capturing objectives.
HMS Tynedale will provide fire support from the Estuary.
Notes:
To destroy the bridges, Infantry must advance to occupy the bridge zones which will activate an IED after a 5-minute delay.
The HMS Campbeltown has to break through the dock gate wall to its waypoint, disembarking its infantry, activating demolition charges (IED) to explode in 20 minutes.
Message will be generated when an objective is achieved.
Unzip ST NAZAIRE RAID and save in your Scenarios Folder
Unzip CONNAUGH – ST NAZAIRE and save in your maps folder
101 downloads
(0 reviews)0 comments
Updated
-

The Defense of Ceuta
THE BATTLE OF CEUTA
By Connaugh
The government of Morocco has repeatedly called for Spain to transfer the sovereignty of Ceuta, drawing comparisons with Spain's territorial claim to Gibraltar.
The Spanish position is that Ceuta is an integral part of Spain, and has been since the 16th century, centuries prior to Morocco's independence from France in 1956,
whereas Gibraltar, being a British Overseas Territory, is not and never has been part of the United Kingdom. Morocco has claimed the territory is a colony.
One of the chief arguments used by Morocco to reclaim Ceuta comes from geography, as this exclave, which is surrounded by Morocco and the Mediterranean Sea,
has no territorial continuity with the rest of Spanish territory. This argument was originally developed by one of the founders of the Moroccan Istiqlal Party, Alal-El Faasi,
who openly advocated the Moroccan conquest of Ceuta and other territories under Spanish rule.
SITUATION:
The Istiqlal party has gained control of the government of Morocco and has ordered Armored Forces to invade Ceuta to return it to Moroccan sovereignty.
MISSION:
Spanish forces are to defend Ceuta from invasion by Moroccan Forces.
The Torre de Francisco de Asis, Torre de Piniers and Puente Del Quemadero are to be held until they are considered untenable and forces are to retreat to Ceuta. The city of Ceuta is to be defended.
FORCE COMPOSITION:
1st Platoon / 3rd Armored Cavalry Regiment - 2 x Leopard 2A4
2nd Platoon/ 3rd Armored Cavalry Regiment - 2 x Leopard 2A4
3rd Platoon / 3rd Armored Cavalry Regiment - 2 x Leopard 2A4
1st Platoon / 2nd Spanish Legion Tercio 2 x Centauros B1
54th Regulares Light Infantry with anti-tank weapons
Artillery of 2 batteries of 3 guns each.
Moroccan Forces include M60A3 tanks and M113A1 PC's.
Artillery is expected.
Mission Score dependent on controlling Ceuta at end of mission.
Unzip THE DEFENSE OF CEUTA and save in your Scenario Folder
Unzip CONNAUGH - CEUTA and save in your Maps Folder
249 downloads
-

SLOVENIA: WAR OF INDEPENDENCE
SLOVENIA: WAR OF INDEPENDENCE
By Connaugh
The Ten-Day War or the Slovenian War of Independence was a brief conflict that followed Slovenia's declaration of independence from Yugoslavia on 25 June 1991. It was fought between the Slovenian Territorial Defence Forces and the Yugoslav People's Army.
SITUATION:
The Yugoslav People’s Army is poised on the Croatian border ready to invade Slovenia.
MISSION:
Slovenian Territory Defense Forces are to defend the border crossings at Ormoz, Dolga Vas, and Gornja Radgona.
FORCE COMPOSITION:
Slovenia: 3 x T-55 Tanks Infantry Missile Teams
Infantry Sections with anti-tank weapons
Light Machine Gun units.
Yugoslavia: T-55 Tanks
BTR-70 PC’s
Slovenia must have control of the three towns at mission end.
Notes:
Unzip SLOVENIA – WAR OF INDEPENDENCE and save in your Scenario Folder. Unzip CONNAUGH – SLOVENIA and save in your Maps Folder.
182 downloads
(0 reviews)0 comments
Updated
-
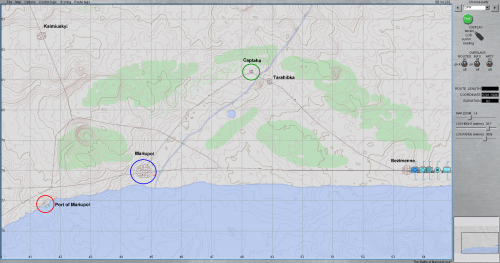
WAR IN DONBAS: THE BATTLE OF MARIUPOL
By Connaugh in COOP Small
WAR IN DONBAS: THE BATTLE OF MARIUPOL
By Connaugh
SITUATION:
Following a revolution in 2014, pro-Russian and anti-Revolution protests erupted across eastern Ukraine. This unrest later evolved into a war between the Ukrainian government and the separatist forces of the Donetsk People's Republic or DPR in the Donbas region of Ukraine. DPR Armored Forces are poised to assault and capture the city of Mariupol, Ukraine.
MISSION:
DPR Armored Forces are to assault and capture Mariupol and the Port of Mariupol.
Secondary objective of Captaha is to be captured.
FORCE COMPOSITION:
DPR:
1st Platoon 3 x T-72B1 Tanks
2nd Platoon 3 x T-72B1 Tanks
3rd Platoon 4 x BMP-2 PC’s
CSS of Repair, Medical, and Supply
Artillery: 2 batteries of 3 guns each
Ukrainian forces are equipped with T-64B tanks, BMP PC’s, and infantry with anti-tank weapons.
Artillery is expected.
Mech Infantry must be in objective to earn victory points.
Notes:
Unzip WAR IN DONBAS – THE BATTLE OF MARIUPOL and save in your Scenario Folder.
Unzip CONNAUGH-MARIUPOL A and save in your Maps Folder.
349 downloads
(0 reviews)0 comments
Updated
-
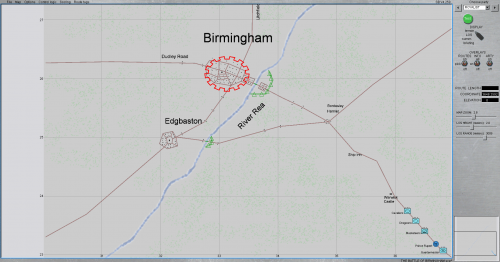
THE BATTLE OF BIRMINGHAM
By Connaugh in COOP Small
SITUATION:
The Battle of Birmingham took place on Easter Monday, 3 April 1643, in and around Birmingham during the First English Civil War. In the skirmish, a company of Parliamentarians (Roundheads) from the Litchfield garrison with the support of some of the local townsmen (Clubmen), approximately 300 men, attempted to stop a detachment of 1,400 Royalists under the command of Prince Rupert from passing through the unfortified parliamentary town of Birmingham. A barricade was put up at the entrance of the town.
MISSION:
Royalist Forces are to push through Birmingham and advance to Litchfield. If the Townsmen fire on Royalist Forces, authorization to set fire to the buildings with HE and HEAT is in effect as the Continental Rules of Warfare prohibit an Open Town from resisting.
EXECUTION:
The Cavalier and Dragoon M60A3 Tank Platoons are to support the plow tanks as they clear a way through the barricade. Infantry from the Musketeer Mech Platoon will capture the town. Missile units in the Mech Platoon will set up for any counter-attack.
FORCE COMPOSITION:
Royalists:
Cavaliers 1 x M60A3 Tank Platoon
Dragoons 1 x M60A3 Tank Platoon
Musketeers 1 x ASLAV Mech Platoon
Quartermaster Repair, Medical, Supply, AEV, and Plow Tank
Artillery 2 batteries of 3 guns each.
Parliamentarians are equipped with T-64A Tanks and Infantry with anti-tank weapons.
Artillery is expected.
Notes:
Unzip and Install THE BATTLE OF BIRMINGHAM.sce in your Scenario Folder.
Unzip and Install CONNAUGH – BIRMINGHAM in your Maps Folder.
106 downloads
(0 reviews)0 comments
Submitted
-
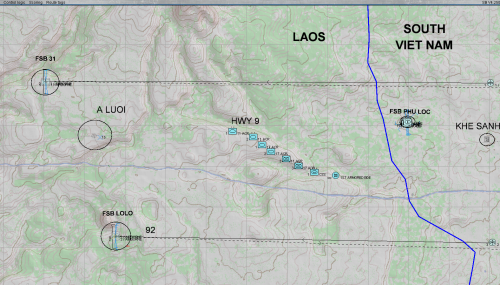
OPERATION LAM SON 719
By Connaugh in COOP Small
OPERATION LAM SON 719 by Connaugh
Operation Lam Son 719 or 9th Route - Southern Laos Campaign was a limited-objective offensive campaign conducted
in the southeastern portion of the Kingdom of Laos from February to March 1971. The objective of the campaign was the disruption of a possible future
offensive by the People's Army of Vietnam (PAVN), whose logistical system within Laos was known as the Ho Chi Minh Trail.
MISSION:
The Airborne Platoons will air-assault to FSB 31 and FSB Lolo.
The 1st Armored Brigade, comprised of the 11th ACR and 17th ACR, is to advance on Highway 9 to A Luoi, leaving the Mech Platoons to defend A luoi.
The Tanks of 11th ACR are to advance to FSB 31 to assist the 1st Airborne in defense.
The Tanks of 17th ACR are to advance to FSB Lolo to assist the 2nd Airborne in defense.
If strong enough, an advance to Tchepone will be attempted.
When mission terminate orders are given, all units will retreat to Khe Sanh.
OBJECTIVES:
A Luoi, FSB 31, and FSB Lolo are to be occupied and defended,
until orders to retreat are given.
Secondary objective of Tchepone is to be captured.
FORCE COMPOSITION:
11th ACR: 4 x M60A1 Tanks, 2 x M113 PC's
17th ACR: 4 x M60A1 Tanks, 2 x M113 PC's
1st and 2nd Airborne Platoons (computer controlled)
1 battery of 6 x M109A3 of Artillery support at FSB Phu Loc.
PAVN forces are equipped with T-55A and PT-76 tanks.
Notes:
Install OPERATION LAM SON 719 in your scenario folder.
Install CONNAUGH - LAM SON 719 in your maps folder
184 downloads
(0 reviews)0 comments
Updated
-

OPERATION RAVIV: THE TEN-HOUR WAR
By Connaugh in COOP Small
OPERATION RAVIV: THE TEN-HOUR WAR
By Connaugh
Operation Raviv, also known as the Ten-Hour War, was a mounted raid conducted by the Israeli Defence Forces (IDF) on Egypt's Red Sea coast during the War of Attrition. Taking place on September 9, 1969, Raviv was the sole major ground offensive undertaken by the IDF against Egypt throughout the war. The raid was to be carried out by Israeli armor and infantry masquerading as Egyptian troops. Arab hardware captured during the Six-Day War had been introduced into service with the IDF, and the force was to use Tiran 5 tanks (IDF designation for the T-55) and BTR-50 armored personnel carriers, camouflaged with the Egyptian sand-colored scheme.
MISSION:
Harel Force, comprised of six T-55 Tanks and three BTR-50 PC’s, is to be landed at El Hafair, south of Suez on the Egyptian coast, by the 11th Flotilla and conduct a raid destroying Egyptian Outposts and Radar Stations. Then, the force is to meet up with the 11th Flotilla at Ras Saafrana and be ferried back to Israeli-held territory in the Sinai.
OBJECTIVES:
Radar Stations at Abu Darag and Ras Saafrana and Egyptian Outposts 1 and 2 on the
Red Sea Coast are to be captured.
FORCE COMPOSITION:
2 x T-55 Tank Platoons
1 x BTR-50 PC Platoon
CSS of Repair, Medical, and Supply
5 x Air strikes will be available
Player Notes:
The 11th Flotilla will land at El Hafair and disembark Harel Force.
The CO can then assign vehicles to players.
Message that an objective has been captured will be generated.
Mech Infantry have to capture an objective.
Mission will end when Harel Force enters Exit Zone for embarkation.
Map file: CONNAUGH – RAVIV E Unzip and save in your Maps Folder
Scenario File: OPERATION RAVIV - THE TEN HOUR WAR Unzip and save in your Scenarios Folder
205 downloads
(0 reviews)0 comments
Updated
-

THE BATTLE OF LARGS: NORWAY-GREAT BRITAIN
By Connaugh in COOP Small
THE BATTLE OF LARGS: NORWAY-GREAT BRITAIN
by Connaugh
The Battle of Largs was an indecisive engagement between the kingdoms of Norway and Scotland, on the Firth of Clyde near Largs, Scotland. The conflict formed part of the Norwegian expedition against Scotland in 1263, in which Haakon Haakonsson, King of Norway attempted to reassert Norwegian sovereignty over the western seaboard of Scotland.
SITUATION:
It is now 2020 and Norway has landed on the coast of West Scotland near Largs in an attempt to re-establish its sovereignty over the area. Norwegian Forces have advanced as far north as Inverkip and south as West Kilbride in Ayrshire, Scotland. They have fortified Largs, Fairlie, Blair Park, the Peel Ports, and the Power Station and Hunterston Castle and have set up an artillery battery on Great Cumbrae Island.
MISSION:
U.K. Armored Forces are to recapture the lost Towns and eliminate the Norwegian presence in Scotland.
The Norwegian Artillery Battery on Great Cumbrae Island is to be eliminated by the Helicopter Assault Force.
OBJECTIVES:
1st Brigade is to recapture Inverkip and Largs.
2nd Brigade is to recapture Blair Park, Fairlie, and the Peel Ports
3rd Brigade is to recapture West Kilbride and the Power Station and Hunterston Castle.
FORCE COMPOSITION: 3 x Tank Platoons. 3 x Mech Platoons
1st Brigade: Royal Dragoons (Challengers) Scot Guards (Warriors)
2nd Brigade Royal Hussars (Challengers) Coldstream Guards (Warriors)
3rd Brigade Royal Tanks (Challengers) Grenadier Guards (Warriors)
Helicopter Assault Force: 3 x CH-47 Chinooks with Infantry (Delayed Arrival)
Artillery: 2 Batteries, 6 Tubes each.
CSS: Repair, Medical, and Supply
Norwegian Forces are comprised of Leopard 2A4 Tanks and CV90/35 PC's
and Infantry with anti-tank weapons.
Message will be generated when an objective is captured.
Mech Infantry must occupy Objectives to earn Victory Points.
Note:
CONNAUGH - LARGS.7Z is the Map file. Unzip and save in your Map Packages Folder.
THE BATTLE OF LARGS - NORWAY-SCOTLAND is the scenario. Unzip and save in your Scenarios Folder.
158 downloads
(0 reviews)0 comments
Updated
-

OPERATION POWERPACK- U.S. INTERVENTION IN DOMINICAN CIVIL WAR 1965
By Connaugh in COOP Small
OPERATION POWERPACK- U.S. INTERVENTION IN DOMINICAN CIVIL WAR 1965
by Connaugh
Rebels, calling themselves Constitutionalists, launched a coup against the president, who was installed by the military, seizing the Radio Santo Domingo building, issuing calls of sedition. They then stormed the Presidential Palace and arrested the President. The U.S. launched Operation Powerpack to prevent a second Cuban Revolution and secure the foreign embassies and evacuate U.S. citizens.
SITUATION:
Rebels have occupied the Presidential Palace, Radio Station and Foreign Embassies.
EXECUTION:
The 505th Airborne is to land at San Isidoro Airbase and secure it.
The 508th Airborne is to land at the airbase and advance to the city of Santo Domingo, securing the Duarte Bridge, Presidential Palace, and the Radio Station.
The 6th Marines are to land at Balos de Haina and advance to Santo Domingo, securing the Foreign Embassies and enable the evacuation of U.S. citizens from Hotel Embajador.
FORCE COMPOSITION:
6th Marines: 3 x M60A1 Tanks, 1 x M113 Mech Platoon
508th Airborne: 3 x M60A1 Tanks, 1 x M113 Mech Platoon
505th Airborne 1 x Infantry Platoon
Rebels are armed with anti-tank weapons and AMX13-75 tanks.
Notes:
The 6th Marines Tank Platoon and the 508th Airborne Tank and Mech Platoons will be
airlifted in at the start of the mission and can be assigned to players by the CO.
Mech Infantry have to secure the objectives to achieve Victory Points.
Area around the Hotel Embajador needs to be clear of Rebels who will fire on the CH47 that will evacuate U.S. Citizens
144 downloads
-

BATTLE OF GROZNY: FIRST CHECHEN WAR 1994
By Connaugh in COOP Small
BATTLE OF GROZNY: FIRST CHECHEN WAR 1994
by Connaugh
The First Chechen War was a rebellion by the Chechen Republic of Ichkeria against the Russian Federation,
fought from December 1994 to August 1996, culminating in the devastating Battle of Grozny.
SITUATION:
Russian Forces have planned to assault the city of Grozny.
EXECUTION:
The 131st Motor Rifle Brigade (Maikop) is to advance along the
Staropromishlovskoye Highway to Mayakovskogo Street and capture the Train Station.
The 81st Guards Motor Rifle Brigade is to advance down
Pervomayskaya Street and capture the Presidential Palace.
FORCE COMPOSITION:
131st Motor Rifle Brigade (Maikop) 2 x 72B1 Sections, 1 x BMP-2 Platoon
81st Guards 2 x 72B1 Sections, 1 x BMP-2 Platoon
CSS with Repair, Medical, and Supply
Artillery: 2 Batteries of 4 Guns each
Chechen forces are comprised of mainly infantry with anti-tank weapons and T-62 tanks.
145 downloads
(0 reviews)0 comments
Updated
-

THE BATTLE OF LUKAYA: UGANDAN-TANZANIAN WAR - 1979
By Connaugh in COOP Small
THE BATTLE OF LUKAYA: UGANDAN-TANZANIAN WAR - 1979
by Connaugh
The Battle of Lukaya was a battle in the Uganda–Tanzania War. It was fought in March 1979 around Lukaya, Uganda between Tanzanian and Ugandan government forces with Libyan and PLO assistance. Tanzania had briefly occupied the town but were driven out.
Mission:
Tanzanian Forces are to launch a counter-attack and retake Lukaya and then advance to Kampala and capture the town.
Tanzanian Forces:
2 x T55 platoons
1 x BTR-70 Mech Platoon
CSS of Repair, Medical, and Supply
Artillery of 2 batteries of 4 tubes each
Ugandan and Libyan Forces are equipped with T-55 Tanks, AMX13 Tanks, and Infantry with anti-tank weapons.
125 downloads
(0 reviews)0 comments
Submitted
-

AMBUSH - THE BATTLE OF DEZFUL IRAN-IRAQ WAR 1981
By Connaugh in COOP Small
AMBUSH - THE BATTLE OF DEZFUL
IRAN-IRAQ WAR 1981
by Connaugh
Iran planned Operation Nasr to be an armored offensive in Khuzestan province (the main province that Iraq attacked). It was designed to relieve the city of Abadan, which was under what would be a nearly year-long siege. The main attack would be carried out by three armored brigades of the 16th Qazvin armored division and the 55th paratrooper brigade of the regular army. The armored thrust would cross the Karkheh River drive from the northeast part of the province past the cities of Susangerd and Ahvaz, down the west bank of the Karun River. At the same time, forces inside Abadan would break out of their positions, and link up with the armored column arriving from the north.
SITUATION:
Iraqi Armored Forces have planned an ambush on both sides of the Highway that the Iranian Force is to travel.
EXECUTION:
The Iraqi force is to stop the Iranians from exiting the Southern Border of the map.
FORCE COMPOSITION:
Iraq: 6 x T-62 Tank Sections
Infantry with anti-tank weapons
3 Artillery batteries of 4 tubes each
Iran: Chieftain Mk5 and M60 Tanks
M113 Mech Infantry
Artillery is expected
105 downloads
(0 reviews)0 comments
Submitted
-

CHAOS IN THE CHOUF-MOUNTAIN WAR IN LEBANON 1983
By Connaugh in COOP Medium
CHAOS IN THE CHOUF-MOUNTAIN WAR IN LEBANON 1983
by Connaugh
The Mountain War or Guerre de la Montagne in French, was a subconflict within the 1982-89 phase of the Lebanese Civil War, which occurred at the mountainous Chouf District located south-east of the Lebanese Capital Beirut. It pitted the Christian Lebanese Forces militia (LF) and the official Lebanese Armed Forces (LAF) against a coalition of anti-government Muslim leftist militias led by the Druze Progressive Socialist Party (PSP), backed by the Palestine Liberation Organization (PLO) and Syria. Hostilities began when the LF and the LAF entered the predominantly Druze Chouf district to bring back the region under government control, only to be met with fierce resistance from local Druze militias and their allies.
In the wake of the June 1982 Israeli invasion of Lebanon, the main Maronite Christian ally of Israel, the Lebanese Forces (LF) militia of the Kataeb Party commanded by Bashir Gemayel sought to expand its area of influence in Lebanon. The LF tried to take advantage of Israel Defense Forces (IDF) advances to begin deploying troops in areas where they had not been present before. This territorial expansion policy was focused on regions known to harbor a large Christian rural population, such as the mountainous Chouf District, located south-east of Beirut. By early 1983, the Lebanese Forces' managed to establish garrisons at a number of key towns in the Chouf, namely Aley, Deir el-Qamar, Souk El Gharb, Kfar Matta, Bhamdoun, Kabr Chmoun and others. However, this brought them into confrontation with the local Druze community, who viewed the LF as intruders on their territory.
SITUATION:
As soon as the last Israeli units left the Chouf, the Druze launched a full-scale offensive on Lebanese Forces positions at villages throughout the Chouf.
MISSION:
Lebanese Forces, comprised of the Christian militias of: Phalangists, Marada, Tigers, and the Guardians of the Cedars of Lebanon, are to advance into the Chouf and recapture the lost villages.
EXECUTION:
Task Force: Tiger objectives are Alayn and Bhamdoun.
Task Force: Phalange objectives are Bemkkine and Souk El Gharb.
Task Force: Marada objectives are Kafoun and Besrine.
Task Force: Cedar Guards objectives are Qabr Chmoun, Deir Mar Maroun,and Deir El Qamar
FORCE COMPOSITION:
Lebanese Forces: Phalange 1 x T-55A Tank Platoon, 1 x BTR-80 PC Platoon
Marada 1 x T-55A Tank Platoon, 1 x BTR-80 PC Platoon
Tiger 1 x T-55A Tank Platoon, 1 x BTR-80 PC Platoon
Cedar Guards 1 x T-55A Tank Platoon, 1 x BTR-80 PC Platoon
Each Task Force has:
CSS of Repair, Medic, and Supply
Truck Mortar Platoon
1 x M1025 HMMWV Recon
Artillery: 2 Batteries x 2 tubes
Druze: T-55A Tanks. Infantry with Anti-tank weapons
Message will be generated when objectives are captured.
89 downloads
-

CAPTURING THE BRIDGE - GERMANY 1982
By Connaugh in COOP Small
CAPTURING THE BRIDGE - GERMANY 1982
By Connaugh
SITUATION:
Soviet Forces have occupied a bridgehead on the Rhine River. NATO has planned an operation to capture the bridgehead to enable follow-up forces to counterattack.
MISSION:
A Heli-borne platoon of the 101st Airborne will air assault the village, code-named ETTER, eliminate the Soviet garrison and occupy the buildings facing the North Bank and defend against any counterattack. A smoke barrage will land in front of the village to provide cover for the assaulting platoon.
A Company, 2nd Armored with two tank platoons and one mech platoon will advance to Etter and defeat any armored Soviet counterattack. Then the river is to be crossed and the North Bank occupied.
FORCE COMPOSITION:
US: 101 Airborne: 1 Infantry Platoon with Anti-tank weapons
2nd Armored: 2 x M60 Tank platoons
1 x M113 Mech Platoon
2 Artillery Batteries of 3 tubes each
Soviet forces are equipped with T-62 tanks and BMP-1 PC's.
Artillery is expected.
Points scored for occupying North Bank.
138 downloads
(0 reviews)0 comments
Submitted
-

WAR OF THE PACIFIC - PART TWO: BOLIVIA-CHILE
By Connaugh in COOP Medium
THE WAR OF THE PACIFIC - PART TWO: BOLIVIA - CHILE
by Connaugh
The War of the Pacific, also known as the Saltpeter War was between Chile on one side and a Bolivian-Peruvian alliance on the other. It lasted from 1879 to 1884, and was fought over Chilean claims on coastal Bolivian territory in the Atacama Desert. The war ended with victory for Chile, which gained a significant resource-rich territory from Peru and Bolivia. However, Bolivia retains the policy of a territorial claim of a sovereign outlet to the Pacific Ocean and the armed forces carry the slogan "The sea is our right. To recover it is a must".
SITUATION:
Bolivia has invaded Chile in an attempt to regain the lost territory from the 1879 War. Bolivian Armored Forces crossed the border in a blitzkrieg with the goal of occupying the port city of Antofagasta. Chilean forces have been forced to retreat from the cities of San Pedro de Atacama, Cerro Pular, San Francisco de Chiu Chiu, Calama, and Sierra Gorda.
MISSION:
Chilean Armored Columns are to advance to Antofagasta and defend the city.
Next, an advance to take back the lost cities and drive the Bolivians out of Chile.
EXECUTION:
A and B Companies will advance to Antofagasta and defend the city.
A Company will then recapture Carmen Alto, Sierra Gorda, Maria Elena, and Calama.
B Company will then recapture San Cristobal and Cerro Pular.
The two forces will then combine to recapture San Pedro de Atacama and San Francisco de Chiu Chiu.
FORCE COMPOSITION:
A Company: 2 x Leopard 2A4 Platoons, 1 Marder 1A3 Platoon
B Company: 2 x Leopard 2A4 Platoons, 1 Marder 1A3 Platoon
CSS of Repair, Medical, and Supply will accompany each force.
2 Artillery Batteries of 6 tubes each will be available.
Bolivian forces include TAM VC tanks, Centauros, and M113 PC's and Infantry with anti-tank weapons.
Artillery is expected.
Message that an objective is captured will be generated.
85 downloads
(0 reviews)0 comments
Submitted
-

THE GRAN CHACO - BOLIVIA-PARAGUAY- PART TWO
By Connaugh in COOP Medium
THE GRAN CHACO - BOLIVIA-PARAGUAY - PART TWO
By Connaugh
The Chaco War (1932–1935); was fought between Bolivia and Paraguay over control of the northern part of the Gran Chaco region of South America which was thought to be rich in oil. It is also referred to as La Guerra de la Sed (Spanish for "The War of Thirst") in literary circles, for being fought in the semi-arid Chaco. The origin of the war is commonly attributed to a long-standing territorial dispute and the discovery of oil deposits on the Andean plains. In 1929, the Treaty of Lima ended the hopes of the Bolivian government of recovering a land corridor to the Pacific Ocean, which was thought imperative to further development and trade. Both Bolivia and Paraguay were landlocked. Though the Chaco was sparsely populated, control of the Paraguay River running through it provided access to the Atlantic Ocean. This became especially important to Bolivia, which had lost its Pacific coast to Chile in the 1879 War of the Pacific.
SITUATION:
Bolivia has invaded the Gran Chaco again in an attempt to gain control of the region.
MISSION:
Paraguayan forces are to advance into the Gran Chaco region and relieve Nanawa which is being besieged by Bolivian forces. Then, an advance is to be made to capture Boqeuron, Isla Poi, Picuiba, Alihuata, Campo Via, Corrales, Toledo, El Carmen and then carry the war into Bolivia and capture Canada Strongest.
EXECUTION:
Northern Force will advance from Puerto Casado and capture Boqeron, Isla Poi, Picuiba, and El Carmen.
Southern Force will advance from Asuncion and relieve the siege at Nanawa, then advance to capture Alihuata, Camp Via, Corrales, and Toledo.
The two forces will then combine to cross into Bolivia and assault Canada Strongest.
FORCE COMPOSTION:
Northern Force: 1 x Leopard 1A5 Platoon
1 x Centauro Platoon
1 x Motorized Infantry Platoon
Southern Force: 1 x Leopard 1A5 Platoon
1 x Centauro Platoon
1 x Motorized Infantry Platoon
CSS of Repair, Medical, and Supply will accompany each force.
2 Artillery Batteries of 6 tubes each will be available.
Bolivian forces include TAM VC tanks and Infantry with Anti-tank weapons.
Artillery is expected.
A message will be generated when an objective is recaptured.
69 downloads
(0 reviews)0 comments
Updated